In this article, I’m going to guide you through a concrete problem I had to solve. Eventually, we’ll see how to use percentage values in the background-position CSS property and how it solves a lot of tough issues.

Usual way

Positioning the image

The usual way to position images inside a container is to specify where the top left of the image is going to be compared to the top left of the container.
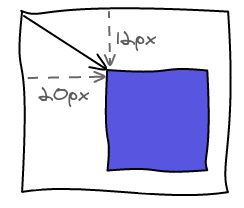
Both are really easy to implement in CSS. On the left you can see the code using a <img> tag inside a container, the other one is a container with a background-image attribute.

.container {
  position: relative;
}
 
.container img {
  position: absolute;
  top: 12px;
  left: 20px;
}

.container img {
position: absolute;
top: 12px;
left: 20px;
}

.container {
  background-position: 12px 20px;
}

Moving inside container

Now let’s say you want to be able to drag the image inside the container and make sure it doesn’t go outside of the bounds. You are going to start doing some basic maths to compute the maximum values for top and left.
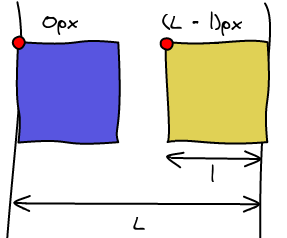
The left position is going to go from 0 to container_width - image_width. Apply the same formula to calculate the maximum top position.

Image is bigger than container

So far so good. Now let’s say our image is bigger than the container. We’re going to extend our definition of inside the container. All the container must be filled with the image.
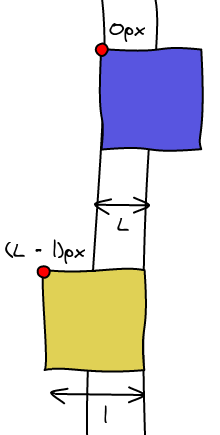
Again, using simple math we can compute the bounds of the left offset. Again, it is 0 and container_width - image_width. Except that container_width - image_width is negative this time.

You are now going to handle positive and negative values. The values now also get really counter intuitive. When you see 12px 20px you have a rough idea of how the image will be positioned. -12px -20px is really harder to conceptualize.

Invariants

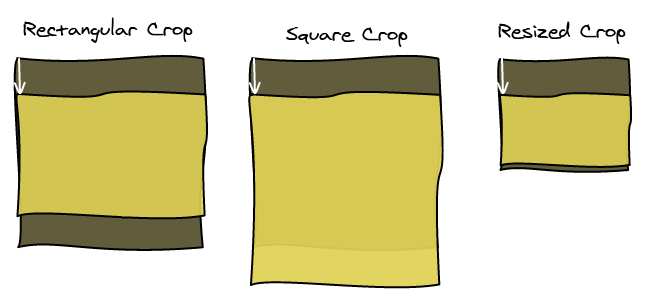
So great, now you have written all your reposition interface and have stored the perfect position the user entered. Now, for some reason, instead of a rectangular container, you want a square one. You are in a not so comfortable position.

The values we computed can no longer be used because they no longer have the same meaning. The within bound constraint no longer holds true and the position is completely off. It is the same if you attempt to scale the image and container.
Background Image Percentage

Definition

Instead of using the previous definition of the image position, we can use another one. When the left border of the image is on the left border of the container, left is equal to 0%. When the right border of the image is on the right border of the container, left is equal to 100%.

Here’s what the two values 0% and 100% looks like in the two examples:
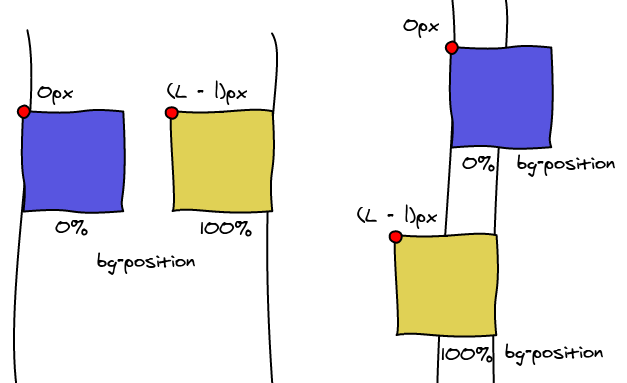
To find the intermediate steps, we just do a linear interpolation between the two values.

left = (container_width - image_width) * percentage

Bound check

The first obvious advantage is that we no longer have to do math to compute if an image is within the bounds of the container. It is if and only if the value is between 0 and 100.

Invariants

Another way to think about this positioning is to draw two axis, one for the image on for the container. If we set the value to be 60%, then the position is going to be where the 60% mark on the two axis is the same point.
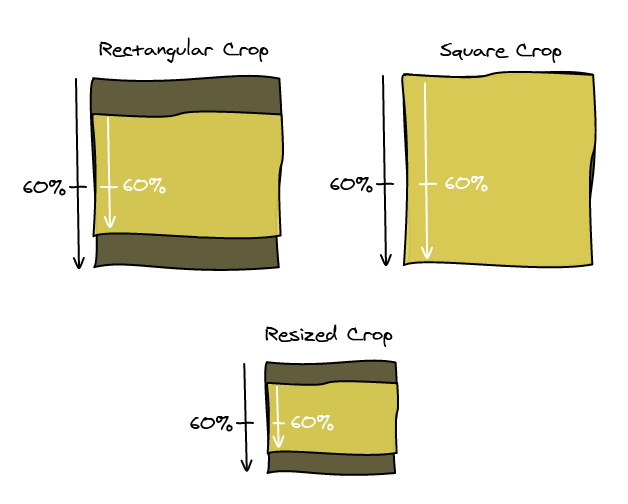
As you can see, this new definition works well with different ratios and scaling.

Horizontal and Vertical

If you pay close attention, you notice that if the image is the same size of the container, the value is ignored. The two axis will be perfectly aligned so all the points will match. Setting 30% or 80% doesn’t matter.
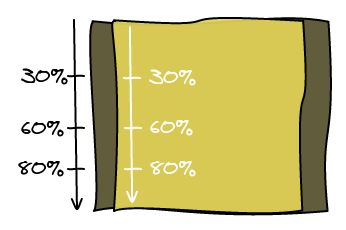
If you don’t believe the picture, just look at the math.

left = (container_width - image_width) * percentage
left = 0 * percentage
left = 0

The takeaway here is that you need the user to set two values. One when the image is going to scroll vertically. One when the image is going to scroll horizontally.

Conclusion

At first, I didn’t understand how percentage values for the background position were working. I was really confused because this is not the way intuitively you would have used percentage.

However, once I tried to implement a robust reposition tool, I realized that this definition of percentage was convenient. It solves in an elegant way many of the issues we had with the usual positioning method.

I hope that you learned something here πŸ™‚

CSS – Vertical Height of Smileys

There’s one big issue when displaying images inline like smileys is to position them at the right height.

Using vertical-align pre-sets

Usually what you do is try to use vertical-align and test all the possibilities. Then you are frustrated because you can’t find the one that is pixel perfect the height you want!

middle , bottom , sub , text-bottom , baseline , text-top , super , top

Using position: relative

What I used to do was to find the nearest vertical-align and then use position: relative; top: -1px; to slightly adjust the vertical position. This works very well, it doesn’t change the line-height and sets the image at the exact position you want!

Using vertical-align: number

Until I re-read the documentation for vertical-align … It appears that we can specify a number instead of the pre-sets! You can just do vertical-align: -2px; and it works. It is relative to the baseline pre-set.

-4px , -3px , -2px , -1px , baseline , 1px , 2px , 3px , 4px

The first non-trivial feature I’ve done at Facebook is now released πŸ™‚

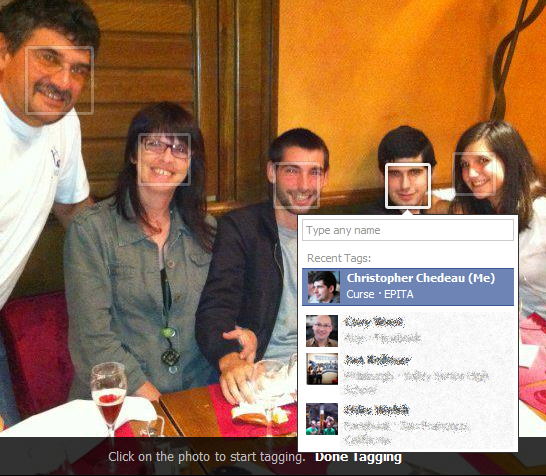
If you have ever tagged an album, you must know the pain it is to go over all the photos and tag everyone. In order to make this process easier, we can make use of image recognition algorithms to find faces.

How it works

When you click enter tagging mode in the photo viewer, all the detected faces are now being displayed. The first face on the left is automatically selected and you are prompted to enter the name of the person. When you press enter, it automatically goes to the next.

In the ideal case, you can just write the first name, press enter, write the second and so on. Then you press the right arrow key to go to the next photo. You don’t have to use your mouse anymore!

Difficulties

This project, strangely, was easy to implement. The difficult part was designing the feature to be user friendly.

Fear of Image Recognition Algorithms

First of all, image recognition algorithms can be frightening. The comparison to 1984 is easy to be made. This is a tough issue to deal with and we’ve tried our best to use these algorithms in a way that is not creepy.

A typical algorithm has two distinct parts. Detection is the step to find the faces in the image. Recognition is trying to match the face with the person.

Here, we only use detection. We just show boxes where the algorithm thinks there are faces. We do not try to guess who the person is.

Image Recognition Algorithms are Not Perfect

Detecting faces in a picture is an extremely hard problem to solve. The current algorithm works well but is not perfect, and sadly will never be.

The way to deal with it is to make the detected faces a suggestion. The user can at any moment ignore the suggestion and tag anywhere else in the picture. The idea is to make it faster to tag for the most common case, when the algorithm is right. When it is wrong, the user can use the old flow and tag whatever he wants.

From the three months I’ve been at Facebook, I’ve seen a strong emphasis to give people control and let them shares things by themselves. Machine learning is used extensively but never to automatically publish things in behalf of the user.

Handling Already Tagged Faces

If the face is already tagged, we don’t want to prompt the user to tag the person again. This is tricky to know if a face has already been tagged.
In an ideal world, the tags would be placed centered in the face. However users don’t always do that. There are a lot of tags in people’s body, feet, hands … Also, since tags trigger a notification and often a mail to the tagged person, users use tags to send an image with someone. The person isn’t even in the photo so no heuristic will help in this case.

We only implement a simple heuristic: if the center of the tag is inside the detected face, we hide the tag. This is going to fail in all the mentioned edge cases but it is not a huge issue in practice. Since we are now going to automatically prompt the user to tag on faces, we are educating them to do so.

Also, most of the tags are done within 24 hours after the image has been uploaded. All the old images with weird cases won’t be seen often.

Conclusion

This project was really interesting as it did not only involve technical skills but also a lot of design. I’ve uploaded several albums since I implemented it and found that it made tagging the entire album more efficient and feel less boring.

This feature also increased the number of tags by few percent, which results in millions of additional tags! Working at Facebook scale is crazy πŸ™‚

When looking at the code of Lightbox.com I remarked that they are not using top and left in order to position their images but margin-top and margin-left. I’ve been wondering why for some time and finally found the reason.

It is a way to position absolutely elements in a container and preserving the padding property of the container.

Using traditional top and left

As you can see, the position is relative to the top left of the container, completely ignoring padding.

position: relative;
padding: 20px;

position: absolute;
top: 0;
left: 0;
position: absolute;
top: 0;
left: 200px;

Using margin-top and margin-left

And now, with this trick, the position is taking padding into account.

position: absolute;
margin-top: 0;
margin-left: 0;
position: absolute;
margin-top: 0;
margin-left: 200px;
position: relative;
padding: 20px;

Why it works?

When declaring an element position: absolute; and not setting any of top, right, bottom and left, the element is going to be rendered using the normal flow for its position. However, it is not going to be added to the flow.

So if you want it to work, do not insert anything non absolute before the elements and make sure you don’t set any of top, right, bottom and left.

Conclusion

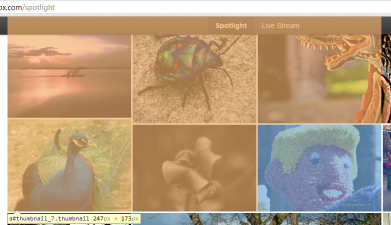
This is a neat CSS trick but there’s a little side effect when debugging. Inspectors are going to highlight the top left area of the element in orange which may be strange πŸ™‚

Laurent Senta had the opportunity to go to the 5th European Lisp Symposium to present Climb, the project I’ve been working on during the past 2 years. He did an excellent job at writing a 4-page paper that sums up the interesting parts of the project (Download).

Presentation

I recommend reading the short article before getting to the slides. Download the PPTX if you want to see the speaker text.

This is the third (and last) presentation about my work on Climb at the LRDE. During the first one I tackled genericity on data structures, the second was about genericity on values and this one talks about genericity on algorithms.

Climb – Property-based dispatch in functional languages

Abstract: “Climb is a generic image processing library. A generic algorithm interface often requires several different specialized implementations. Olena, a C++ library, solves this using properties.

We present a way to dispatch a function call to the best specialized implementation using properties in a dynamic programming language: Common Lisp. Then, we introduce examples of algorithms and properties used in image processing.”

MMO-Champion Miscellaneous Work

WoWDB Design

I was the only active developper on db.mmo-champion.com and since I was no longer working at Curse, they decided to restart a database project, WoWDB.com, on the shiny Cobalt platform that powers SWOTR, Aion and Rift databases. Just like a person needs a home, each new website needs its own cozy space on a server to exist and be accessible to users. This space is usually provided by web hosts. If your wait time is anything over 3 seconds, people are going to do business with a competitor using more optimal hosting services. Luckily for you, such website hosting canada are out there, and plenty of them are inexpensive, too.

The release of Mist of Pandaria beta being close (less than 24 hours away) and the website without any CSS, I’ve been asked to come up with a design. 3 hours later, here’s the result of the seo for medical websites.

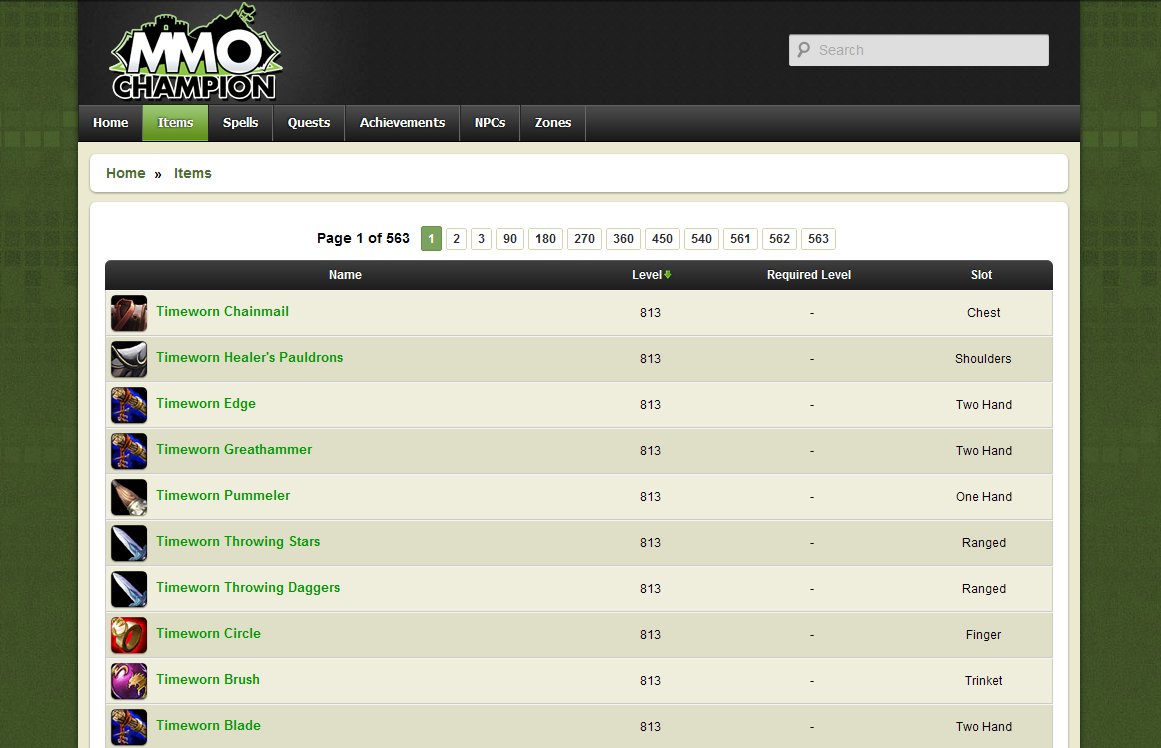
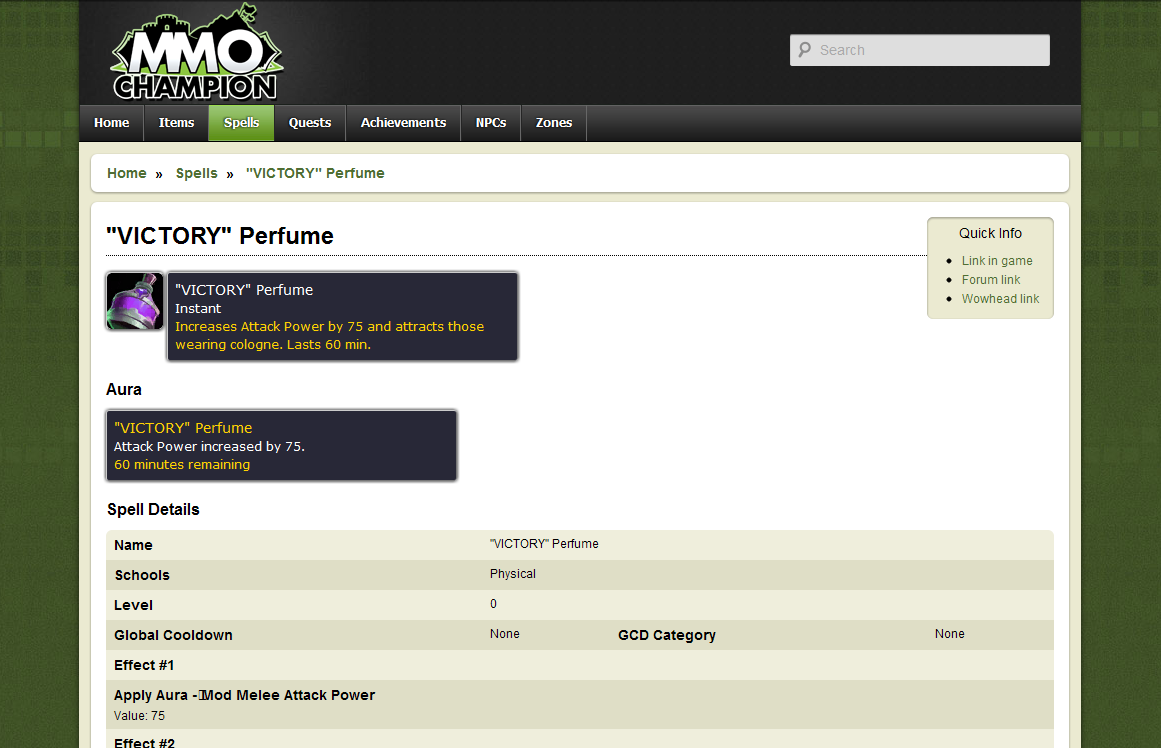
As you can see, I borrowed a lot of design elements and CSS from the original MMO-Champion website. I really like the end result. Often database websites are on black backgrounds, making it with a light one gives a fresh look.

You can also check out premium managed wordpress hosting services for your business.

Countdown

MMO-Champion uses countdown to make hype around certain events. I’ve had the pleasure to do two of them, one for each expansion.

Cataclysm

28Hours
56Minutes
43Seconds
23Hours
56Minutes
43Seconds

That’s my first one. The hardest part was to find a good font that doesn’t suck with a big font-size. (Note: the times here are placeholders!)

Mist of Pandarian


051648

As you can see, my Photoshop skills have improved a lot since the first one πŸ™‚ I’ve been able to steal design elements from Blizzard website to make the artwork look better.

You can notice that each digit of numbers is absolutely positioned, therefore it doens’t constantly move when the number changes.

I also use a Brawler, a custom Google Web Font and text-stroke to help with anti-aliasing.

setInterval(function () {
var sec = ” + (Math.floor(-new Date() / 1000) % 60 + 60);
if (sec < 10) sec = '0' + sec;
$('.seconds strong').text(sec);
$('.seconds .left').text(sec[0]);
$('.seconds .right').text(sec[1]);
}, 1000);

I’m working on an application in the browser that lets you take notes. I don’t want to have the burden to save them on my own server therefore I want to use Github Gists as storage. The challenge is to be able to communicate with the Github API 100% inside the browser.

Since it is a difficult task due to Cross-origin resource sharing limitations and multi-step OAuth process, I decided to share with you a working procedure I found. It involves different communication protocols such as HTTP Redirect, window.postMessage, Ajax post and get and a small PHP proxy using cURL.

Login Phase

Phase 0 – Create an application

Before doing anything, you have to create a Github application. It will provide you the client_id and client_secret as well as an admin to put the redirect URL.

Phase 1 – Get authentication code

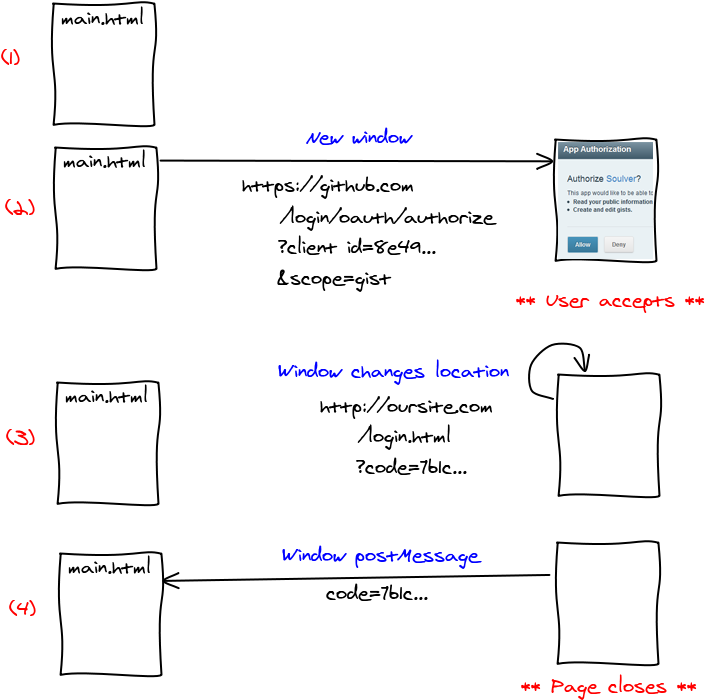
Using Github API OAuth guide we learn that we have to redirect the user to a page on github server. After the user authorizes the application, the page is redirected to one of our page with a code.

Since we do not want to leave the current page (it would make all the user changes vanish) we must open the page in another context. The first one I tried was an iframe but github has the X-Frame-Options header set that prevents embedding the page in the iframe.

So the other option was to open a new window. With window.open it was really easy to do so. The only tricky part was to actually give back the result to the main window. After digging, I found the following snippet of code that works well: window.opener.postMessage(message, window.location).

Phase 2 – Get access token

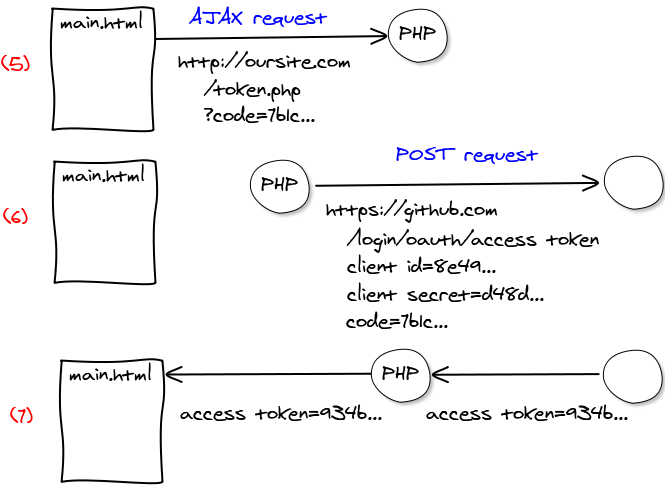
We are back in the main window and have the code. We now need to exchange this code for a token. I really wonder why they didn’t give us the token already but well, there must be a reason! In order to get the token, we must send a POST request to a page on github.

However another difficulty comes in, this one page does not have a Access-Control-Allow-Origin header set to our domain. So basically, we cannot access it from the browser using AJAX. Since it’s a POST request, we cannot even use JSON-P to bypass it.

I did not want to have a server but I am resigned to write a small PHP proxy that will forward the call. I believe that the main reason why they blocked it was because they ask for the client_secret. They don’t want us to write it down in our Javascript in plain sight.

Phase 3 – Enjoy!

Now that we have got our token, we can call all the APIs on Github using post and get AJAX requests and they all work fine. One good thing is the fact that the token is permanent. Unless you change the permissions you request or the user revokes your application, every time the user logs in, he will be associated the same token.

You can safely store the token in the user’s browser with localStorage in order to keep them logged when they come back to the application. Just make sure to catch 401 Unauthorized error on requests in case the token is no longer valid and ask the user to log in again.

Demo

And here’s the demo! The source code is really small and available on github. If you plan to integrate an in-browser login, it can be used as a starting point.

You might want the link to revoke the access from the dummy application for testing purposes.

Conclusion

At first glance, the login process seemed to be really straightforward, you just had 2 requests to get your code and token and you are good to go. But doing so in the browser revealed itself to be a lot harder. I’m not satisfied with the process as it involves many different technologies but that’s the best I could find. If you handled things differently please tell me πŸ™‚

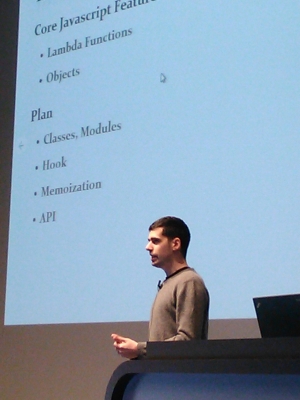
I recently had the chance to do a 2-hour Javascript evangelism talk at Dassault SystΓ¨mes. Unfortunately the presentation has not been recorded. I reused my the presentation I did at EPITA at the beginning and added a second part with a lot of demos. I’ve written down notes about the second part so you can get an idea.

Developer Tools

  • Web Inspector. It is integrated into Google Chrome and has all the features you would be expecting in an IDE. The console is really powerful as it lets you browse through the Javascript objects. You no longer need to write endless printing functions. You can edit the HTML and CSS without a page reload, it makes designing interfaces a lot more efficient. There is also a full panel dedicated to profiling both Javascript and DOM events.
  • JSFiddle. Web programming is all about interactivity. Not only you with the program (REPL) but also with other people. Everything you do can be one link away. JSFiddle lets you try and experiment things without the need of an IDE and allows you to show it to the world easily.
  • JSHint. Because Javascript, the language, has design issues and is highly dynamic, it is useful to enforce good practices and to set common programming rules when working together. Always in the spirit of the web, you can just copy and paste your code to check it. Note that JSHint can also be integrated in all major text editors and IDEs.

CSS

HTML and CSS were traditionally used to make websites and forms. We can now make completely different things.

  • jmpress.js. Here’s an example of how to use 3D in CSS in order to make animated presentation. One important thing to notice is how easy it is to use it. Just include jmpress.js in the page and add data-x="-5000" data-rotate="180" attributes to your HTML. It just works!
  • CSS Panic. In order to show how powerful CSS got those days, here’s a game completely written in HTML + CSS. There is 0 lines of Javascript!

Canvas

Canvas is just a rectangle where you can manipulate each pixel’s color.

  • RayTracer. Ray Tracer is a common computer science school project. Usually, you write it on your computer and sometimes share the resulting image but you don’t really share it because no one want to take the pain of compiling it on their machine. With Javascript, you can just share a link and everyone can test it!
  • Canvas Rider. You can now create games in the browser. There is even a level editor implemented that follows principle of the web: interactivity. You can draw the map and move your character at the same time. When you are done, you are a single click away from saving the map and sharing it to people.
  • pdf.js. The browser is now able to create applications that have always been restricted to native ones. The perfect example is this demo by Mozilla of a pdf renderer written exclusively in Javascript!

SVG

SVG let you manipulate vector graphics such as line, curve, circle …

  • Cloth Simulation. Javascript implementations have gotten fast enough to do real time constraint solving simulations such as this one. It uses SVG to easily render the graph.
  • Simulated Annealing. It’s another school project that gains from being written in the web. This would have probably been written in console mode, using ascii art and generating images as output. The parameters would have been entered in the command line. We can instead exploit HTML to make forms that update in real time, and SVG to render the problem and a graph to display the progress.

WebGL

WebGL is an implementation of OpenGL in the browser. It let us use the graphical card from Javascript.

  • 3D Simulated Annealing. Same as previous demo but this time there is a 3D representation of the progress. It also follows the interactivity rule, you can use your mouse and WASD to explore the scene. This demo uses Web Workers to exploit multiple cores.
  • WebGL Maps. The graphical card is dedicated to manipulate images, therefore you can use it to improve performance on image intensive applications such as Google Maps.
  • Bevelity. Ever wondered if it was possible to write a complex application such as 3DSMax in the browser? Bevelity is an attempt to prove it true.
  • Water Simulation. Another physics simulation demo with always the web plus: you can move the ball πŸ™‚
  • Hello Racer. This is one of the thousand demos that shows you a beautiful car with glossy reflects … This one has a unique feature: you can move the car! This must not have taken more than a few dozens of lines and yet has a huge impact!
  • Morph Target. Pixar also find uses for the web. Here’s a demo to create facial expressions.
  • Rome. Browsers now embed a video tag. Using it in combination with WebGL, Google made a wonderful 3-minute animation. You can use the mouse to interact with it. It moves the camera, pixelate the video and even make appear various monsters.

Performance

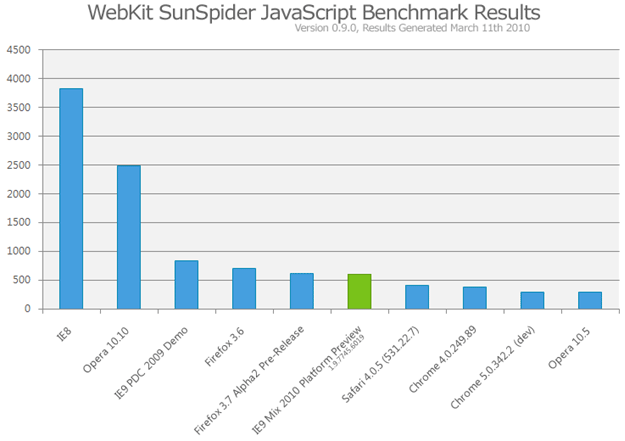
Javascript performance are impressively improving from months to months. It is now possible to write computing intensive programs and make them run at decent speed.

  • JSPerf. If you have a doubt on which browser is faster for a specific feature or when you have two ways to do things, which one is faster, JSPerf is made for you!
  • JSLinux. Typed Arrays introduced for WebGL made possible to write a CPU Virtual Machine able to run a copy of linux in under 7 seconds.
  • repl.it. Emscriptem is a wonderful tool that translates LLVM assembly code into Javascript. It made possible to compile Ruby, Python, Lua and Scheme directly from their sources to Javascript.
  • Broadway. Last but not least, a H.264 video decoder has been compiled to Javascript using Emscriptem. It manages to decode the sample videos at 60 frames per second. This is an exceptional feat for a scripting language!

Conclusion

It is now possible to write the same complex applications we seen in the past in the browser. And it gives one huge added value: interactivity. There’s absolutely nothing to install, you just have to give a link! You can combine all the render options such as HTML, CSS, Canvas, SVG and WebGL to make your program.

The next talk I’m going to do is at the JSConf! I hope to see you there!

Tech Companies Recruitment

I am happy to tell you that I am now a Facebook employee!

A bit of history

Two years ago, like many of you, I applied to Google (thanks tsuna). Obviously I didn’t get in. I did not even made it to the second interview! After analysis, I screwed up everything!

  • Spoken English is hard without training (I’m French). I struggled explaining simple things such as “What’s the difference between Linked Lists and Arrays”.
  • I did not have parallelism nor Java courses yet. Therefore the implementation of the classical producer & consumer problem was painful.
  • At the end, I had no questions to ask. It made me look not motivated.
  • I have been asked about my hardest to fix bug. This was the lethal question, I had just no idea what to answer!

Meanwhile

What Would Google Do? Soon after the interview, I read the excellent book What Would Google Do?. It talks about business models from the new internet companies such as Google, Facebook, CraigsList, Wikipedia … There is one chapter about blogs that was a revelation.

When I applied to Google, the only thing they had on me was a resume with the name of various projects I’ve been working on. I find excessively hard to judge my skills based on my resume. This is where a blog comes in. A blog lets you show off your skills and interests without constraints from a resume.

Most of the articles fall into one of those three categories:

  • Projects I’ve worked on using videos, dozen-pages reports …
  • In-depth explanation of specific techniques (that no one cares about).
  • Fun programming stuff I found.

It gives me the opportunity to show what I am interested in and concrete examples of what I am capable of. If you scroll over the many pages of my blog, you will have a much better vision of who I am than a resume.

Another try

And one more thing: A blog also makes you visible! I have been contacted by a Facebook employee after he saw my post JSPP – Morph C++ into Javascript on Hacker News! (Yeah I know, that’s crazy!!!). Since I did not want to fail miserably again, I took some more serious preparation (thanks Xavier). Here is a summary of what made me ace the interviews.

  1. Know the interview process. A typical 45 minutes interview goes like this:
    • Explain a project of your resume (10 minutes).
    • CS Puzzle (25 minutes)
    • Questions (10 minutes)

    I completely failed my Google interview because I had no idea how interviews work. As you can see, half of the interview is not about Computer Science! So you have to prepare for it as-well. Prepare a speech for 2 or 3 projects from your resume that makes you shine for the position you apply for. Make a list of 15-20 questions and you should be good to go.

  2. Cracking the Coding InterviewTrain on CS problems. More than half of the recruitment process is about your Computer Science skills. However the process is flawed: it is mostly focused on solving puzzles. You can be a wonderful programmer that excels at making easy-to-use APIs and wonderful self-documented code but that skills will not be tested.

    In order to train, the book Cracking the Coding Interview has 150 questions. The quality of individual questions and answers is not top notch, but it will give you a good insight of what will be asked. If you are done with it, you can get more on CareerCup.com.

  3. The Google ResumeYour interviewer should want to have a beer with you. This is probably the most helpful advice I have taken from the really good book The Google Resume. Your interviewer is going to be your co-worker right after you get hired, as a consequence, during your interview process, act like if it was a friend instead of it being a faceless institution.

Conclusion

All those adventures made me learn one thing. In order to get your dream job, you not only have to be a good programmer, you also have to learn how to sell yourself and have a good preparation for the extremely codified process that interviews are.

If you want to get a job at the Silicon Valley, I urge you to read the three books I referenced and start a blog right now. It is a long term investment that pays off!

Bonus

This is what I sent to accept the job offer :p