Now that I am working everyday with an awesome designer, I'm starting to discover the designer side of things. I got introduced to typography and realized how bad support for good typography was in the browsers. The tale to implement proper text layout algorithms started.
Line breaking and Hyphenation
I first read two fundamental papers on the algorithms that power TeX. The first one, written by Franklin Mark Liang, explains how to properly hyphenate words. When reading it in 2012, it is a bit unreal all the care taken to reduce memory as 20KB was a hard limit for the project. The second is written by Donald Knuth and Michael Plass and talks about finding when to break lines. It gives a very good introduction of all the subtleties behind the seemingly easy line breaking operation.
I was about to implement the papers when I realized that Bram Stein already wrote a Javascript version. Hypher to hyphenate and TypeSet for line breaking.
Displaying a line
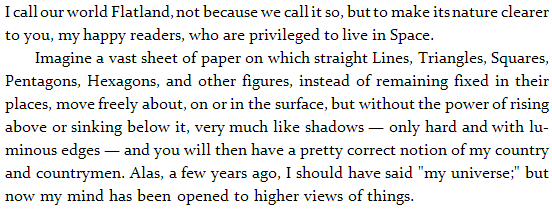
In all our examples, we are going to try and display the first two paragraphs of the novel Flatland by Edwin Abbott. I've seen this being used by two designers interested in typography so I guess I'm going to use it too!
Absolute Position Everything
The text algorithms give us for each character, its position in the paragraph. The first idea that comes to mind is to create one span for each element and absolutely position it in the DOM.
<span style="left: 0px; top: 23.2px;">I</span> <span style="left: 5px; top: 23.2px;"> </span> <span style="left: 7.529411764705882px; top: 23.2px;">c</span> <span style="left: 14.529411764705882px; top: 23.2px;">a</span> <span style="left: 22.529411764705884px; top: 23.2px;">l</span> <span style="left: 27.529411764705884px; top: 23.2px;">l</span> <!-- ... --> |
First thing to notice is the presence of instead of a white space. In HTML, white spaces around tags are generally omitted. This is useful as you can properly indent your HTML code and it will not add many unwanted white spaces in the result. It can also be annoying when you want to layout things with display: inline-block; but that is another problem. In this case, we use to force a real white space.
Then, we can see that position have decimal precision. Nowadays, browser implement sub-pixel rendering and we can use it to evenly space words in a line. This makes less abrupt spacing changes.
The first downside of this technique is the weight of the generated output. Having one DOM element per letter is highly inefficient, especially on mobile devices.
The second is about text selection. It varies widely between browser but usually double click to select a word is not working. The highlight is not contiguous, there are unwanted white spaces around letters/words. For some reason, when you use shift+right, you have to go two times right to highlight the next letter. And finally, when copy and pasting, \n are not taken into account.
White Space Flexbox
The second approach is to display the text line by line and use real textNode for words instead of a DOM element for each character. The issue we are going to face from now on is to make sure spaces have proper width such that the line is justified.
The first technique I am going to present has been found by Kevin Lynagh. We are going to use flexbox to stretch the spaces such that they fill the available space.
|
|
The visual display is perfect as it properly set the width of the glue elements with sub-pixel precision. However, copy and paste is not working as intended. All the spaces are being replaced by \n as glue elements are display: block;. Browser support of Flexbox is still early so this technique cannot be used on popular websites.
If you want to render links, this approach is going to be problematic when they span over two lines. You are going to have to break the tag into two. This means that people clicking on the first part will not see the second highlight. If you had any Javascript listeners, you are going to have to duplicate them ... It is making things more complicated.
One-line Justify
We really want the browser to do the justification part, but by default, it will not justify only one line of text. The reason is that the last line of any paragraph is not going to be justified. Using a trick I explained in a previous blog article, we can force it to do so.
<div class="justify"> I call our world Flatland, not because we call it so, but to make its nature clearer </div> <div> to you, my happy readers, who are privileged to live in Space. </div> |
.justify { text-align: justify; word-spacing: -10px; } .justify:after { content: ""; display: inline-block; width: 100%; } |
The browser will not stretch the white space below the width of a white space. It will consider that there isn't enough room and put the last character on the next line and then justify. In order to force it to do so, we want to remove some pixels from spaces. We can do that using word-spacing: -10px;. You've got to make this value at least equal to the width of a white space not to worry about it anymore. Note: don't make it too important (like -99999px) as if the computed line width is negative, the browser will not attempt to justify the text.
This technique is working on all the major browsers (IE>7) and very light in term of DOM overhead. The copy and pasted text is not perfect as there will be \n at every end of line (80-columns newsgroup style) but is good enough. We still have the tag issue as the previous technique.
Word-spacing
The previous techniques found ways to let the browser compute the proper white space widths. We made all the hard work of finding the best line-breaks, so we know the widths of the white spaces. Why don't we tell it to the browser. For each line, we can update the word-spacing accordingly. This is the technique used by TypeSet.
<p> <span style="word-spacing: -1.4705882352941178px;"> I call our world Flatland, not because we call it so, but to make its nature clearer </span> to you, my happy readers, who are privileged to live in Space. </p> |
It is however to good to be true. Webkit has a bug where fractional pixel values are not supported with word-spacing, it has been reported in 2008 but not yet being worked on by anyone. So if you really want to work with Webkit, you have got to distribute the fractional values between words.
<p> <span style="word-spacing: -2px;"> I call our world Flatland, </span> <span style="word-spacing: -1px;"> not because we call it so, but to make its nature clearer </span> to you, my happy readers, who are privileged to live in Space. </p> |
The downside now is that the first few letters look really close to each other and the remaining letters are farther away. Since all the modifications we do is adding spans around, text selection and copy and paste are completely unaffected. We still have the issue however.
White Space Custom Width
If word-spacing doesn't work, we can instead set the width of each white space by hand. We are going to update margin-left with the amount we would have sent to word-spacing.
Unfortunately, if you combine textNodes and spans with , the white span will not appear. You have to wrap the textNode in a span. This makes the DOM more complicated than it should have been.
One last detail is that for some reason, the browser will not add any line break. Therefore you have to insert your own br tags.
<p> <span>I</span><span style="margin-left: -1.4705882352941178px;"> </span> <span>call</span><span style="margin-left: -1.4705882352941178px;"> </span> <!-- ... --> <span>nature</span><span style="margin-left: -1.4705882352941178px;"> </span> <span>clearer</span><span style="margin-left: -1.4705882352941178px;"> </span> <br /> to you, my happy readers, who are privileged to live in Space. </p> |
This technique doesn't suffer from the problem. The text copy and pasted still have \n at the end of each line. It enables sub-pixel text position in Chrome. The main downside is that it adds two new DOM elements per word.
Horizontally Scale the Line
In pdf.js, they write all the text into a canvas but display transparent text on-top in order to get browser selection. Instead of handling justification properly, they cheat and scale the text horizontally to fit the width.
<div style="transform: scale(0.9545764749570032, 1); transform-origin: 0% 0%;"> These detailed metrics allow us to estimate parameters for a </div> <div style="transform: scale(0.9401883384450235, 1); transform-origin: 0% 0%;"> simple model of tracing performance. These estimates should be </div> |
The trick works because the text is not being displayed. If you attempt to scale horizontally your text to fit the width of your page, you are going to see very bad scaling artifacts on your letters.
This technique is not quite what we want. It scales both letters and white spaces where we only want to scale white spaces. Therefore, the displayed text and the overlaid text do not always exactly match as seen in the image:
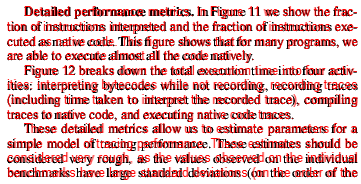
I'm not 100% sure what their constraints are but I'm hopeful that the one line justify trick would improve their text selection.
End of Line Padding
What we really want to do is to put a <br /> at the end of all the lines and let the browser justify for us. Unfortunately, this is not working, the browser doesn't justify when there are <br />. Instead, we can exploit the fact that the browser uses a first-fit method to break the lines and force it to break where we want it to.
At the end of each line, we are going to add a empty span element that has the dimensions of the remaining space in the line. This way, the browser is going to see that the text and white space and our element make a full line, and then go to the next line.
Now, we really don't want this element to appear, or it would just be the equivalent of a text-align: left;. Here is the trick, the margin-right property of the last element of the line is being ignored after the browser line-breaking algorithm.
<p style="text-align: justify;"> I call our world Flatland, not because we call it so, but to make its nature clearer <span style="margin-right: 132px;"></span> to you, my happy readers, who are privileged to live in Space. </p> |
It works like a charm when you don't need to go below the default white-space size. If you do, then things get a little bit more complicated. We have to use word-spacing: -10px but then, the last line is going to be using this spacing instead of the default one.
The solution is to use our justify class from before that forces the last line to be justified and add an element at the end with the proper size to fill up the space. This time, we want the width of this element to remain after the line-breaking algorithm. So instead of doing a margin-right, we are just going to do margin-left.
<p class="justify"> I call our world Flatland, not because we call it so, but to make its nature clearer <span style="margin-right: 132px;"></span> to you, my happy readers, who are privileged to live in Space. <span style="margin-left: 115px;"></span> </p> |
This solution doesn't suffer from the issue as we don't wrap lines into an element. It doesn't affect copy and paste as the end of line elements are empty and inline. It is also very lightweight as we only add one DOM element at the end of each line. And, it is cross-browser and supports sub-pixel word positioning.
Conclusion
By default, the browser doesn't let you hint where you want it to break in a justified paragraph, we have to send carefully crafted inputs to exploit the way its internal rendering algorithm work. If you are to use one of the described techniques, use the last one as it solved all the pain points the others have.
You can test all of them using this JSFiddle Demo. Note: they have been hard-coded to work on Chrome Windows. If you are not using both, then it will likely be all screwed up because the font size is not the same and browser prefixes have not been added.
 Mac:
Mac: 

 that is less than ideal but gives the idea of movement.