I'm working on an application in the browser that lets you take notes. I don't want to have the burden to save them on my own server therefore I want to use Github Gists as storage. The challenge is to be able to communicate with the Github API 100% inside the browser.
Since it is a difficult task due to Cross-origin resource sharing limitations and multi-step OAuth process, I decided to share with you a working procedure I found. It involves different communication protocols such as HTTP Redirect, window.postMessage, Ajax post and get and a small PHP proxy using cURL.
Login Phase
Phase 0 - Create an application
Before doing anything, you have to create a Github application. It will provide you the client_id and client_secret as well as an admin to put the redirect URL.
Phase 1 - Get authentication code
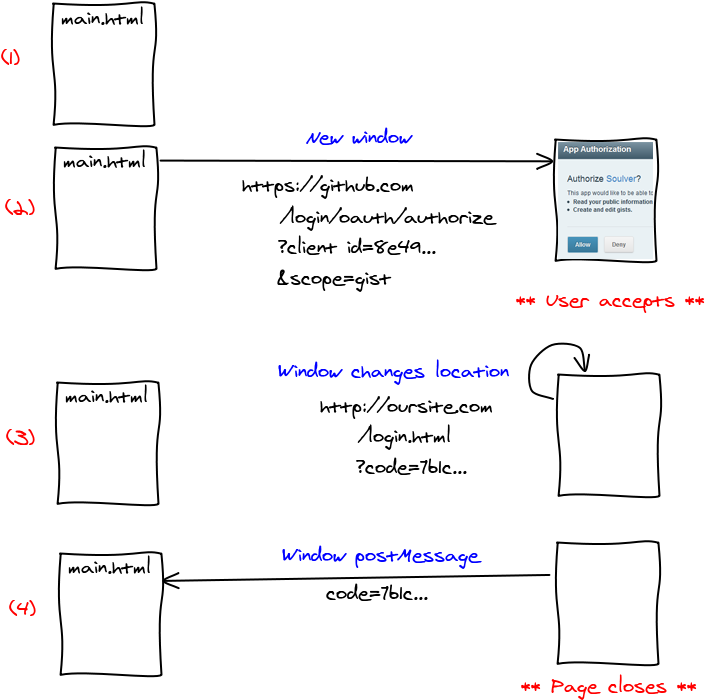
Using Github API OAuth guide we learn that we have to redirect the user to a page on github server. After the user authorizes the application, the page is redirected to one of our page with a code.
Since we do not want to leave the current page (it would make all the user changes vanish) we must open the page in another context. The first one I tried was an iframe but github has the X-Frame-Options header set that prevents embedding the page in the iframe.
So the other option was to open a new window. With window.open it was really easy to do so. The only tricky part was to actually give back the result to the main window. After digging, I found the following snippet of code that works well: window.opener.postMessage(message, window.location).
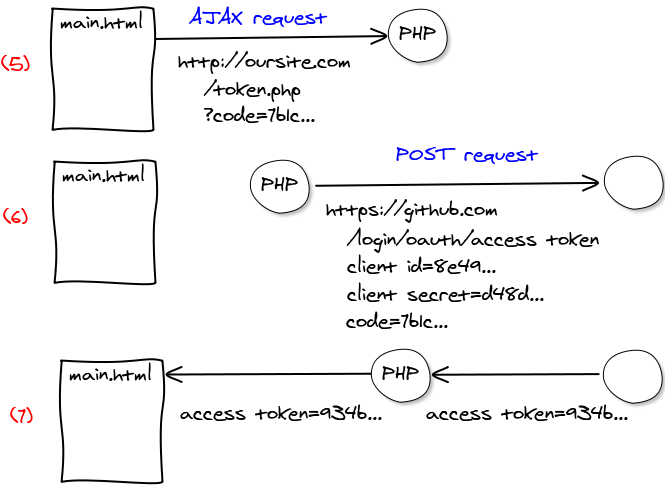
Phase 2 - Get access token
We are back in the main window and have the code. We now need to exchange this code for a token. I really wonder why they didn't give us the token already but well, there must be a reason! In order to get the token, we must send a POST request to a page on github.
However another difficulty comes in, this one page does not have a Access-Control-Allow-Origin header set to our domain. So basically, we cannot access it from the browser using AJAX. Since it's a POST request, we cannot even use JSON-P to bypass it.
I did not want to have a server but I am resigned to write a small PHP proxy that will forward the call. I believe that the main reason why they blocked it was because they ask for the client_secret. They don't want us to write it down in our Javascript in plain sight.
Phase 3 - Enjoy!
Now that we have got our token, we can call all the APIs on Github using post and get AJAX requests and they all work fine. One good thing is the fact that the token is permanent. Unless you change the permissions you request or the user revokes your application, every time the user logs in, he will be associated the same token.
You can safely store the token in the user's browser with localStorage in order to keep them logged when they come back to the application. Just make sure to catch 401 Unauthorized error on requests in case the token is no longer valid and ask the user to log in again.
Demo
And here's the demo! The source code is really small and available on github. If you plan to integrate an in-browser login, it can be used as a starting point.
You might want the link to revoke the access from the dummy application for testing purposes.
Conclusion
At first glance, the login process seemed to be really straightforward, you just had 2 requests to get your code and token and you are good to go. But doing so in the browser revealed itself to be a lot harder. I'm not satisfied with the process as it involves many different technologies but that's the best I could find. If you handled things differently please tell me 🙂


 Web Inspector. It is integrated into Google Chrome and has all the features you would be expecting in an IDE. The console is really powerful as it lets you browse through the Javascript objects. You no longer need to write endless printing functions. You can edit the HTML and CSS without a page reload, it makes designing interfaces a lot more efficient. There is also a full panel dedicated to profiling both Javascript and DOM events.


