In this article, I'm going to guide you through a concrete problem I had to solve. Eventually, we'll see how to use percentage values in the background-position CSS property and how it solves a lot of tough issues.

Usual way

Positioning the image

The usual way to position images inside a container is to specify where the top left of the image is going to be compared to the top left of the container.

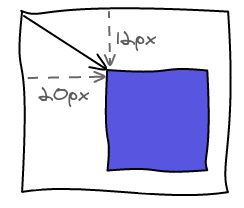
Both are really easy to implement in CSS. On the left you can see the code using a <img> tag inside a container, the other one is a container with a background-image attribute.

.container {
  position: relative;
}
 
.container img {
  position: absolute;
  top: 12px;
  left: 20px;
}
.container {
  background-position: 12px 20px;
}

Moving inside container

Now let's say you want to be able to drag the image inside the container and make sure it doesn't go outside of the bounds. You are going to start doing some basic maths to compute the maximum values for top and left.

The left position is going to go from 0 to container_width - image_width. Apply the same formula to calculate the maximum top position.

Image is bigger than container

So far so good. Now let's say our image is bigger than the container. We're going to extend our definition of inside the container. All the container must be filled with the image.

Again, using simple math we can compute the bounds of the left offset. Again, it is 0 and container_width - image_width. Except that container_width - image_width is negative this time.

You are now going to handle positive and negative values. The values now also get really counter intuitive. When you see 12px 20px you have a rough idea of how the image will be positioned. -12px -20px is really harder to conceptualize.

Invariants

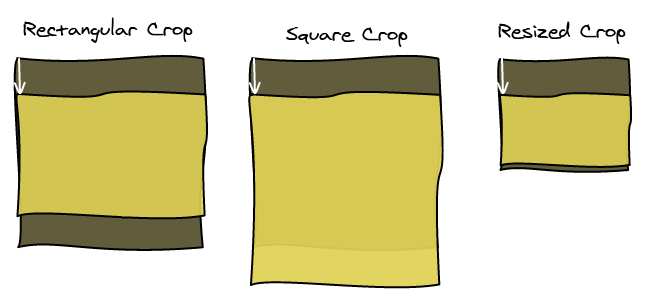
So great, now you have written all your reposition interface and have stored the perfect position the user entered. Now, for some reason, instead of a rectangular container, you want a square one. You are in a not so comfortable position.

The values we computed can no longer be used because they no longer have the same meaning. The within bound constraint no longer holds true and the position is completely off. It is the same if you attempt to scale the image and container.

Background Image Percentage

Definition

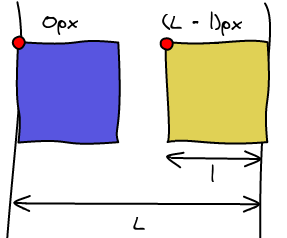
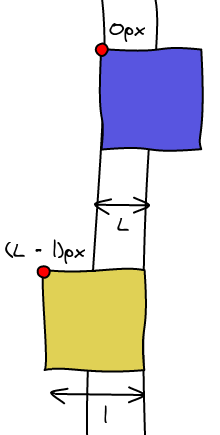
Instead of using the previous definition of the image position, we can use another one. When the left border of the image is on the left border of the container, left is equal to 0%. When the right border of the image is on the right border of the container, left is equal to 100%.

Here's what the two values 0% and 100% looks like in the two examples:

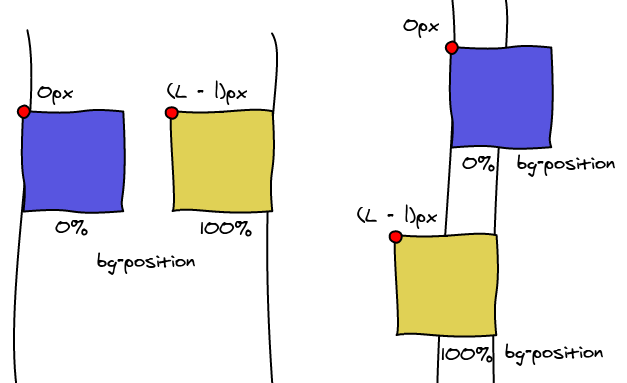
To find the intermediate steps, we just do a linear interpolation between the two values.

left = (container_width - image_width) * percentage

Bound check

The first obvious advantage is that we no longer have to do math to compute if an image is within the bounds of the container. It is if and only if the value is between 0 and 100.

Invariants

Another way to think about this positioning is to draw two axis, one for the image on for the container. If we set the value to be 60%, then the position is going to be where the 60% mark on the two axis is the same point.

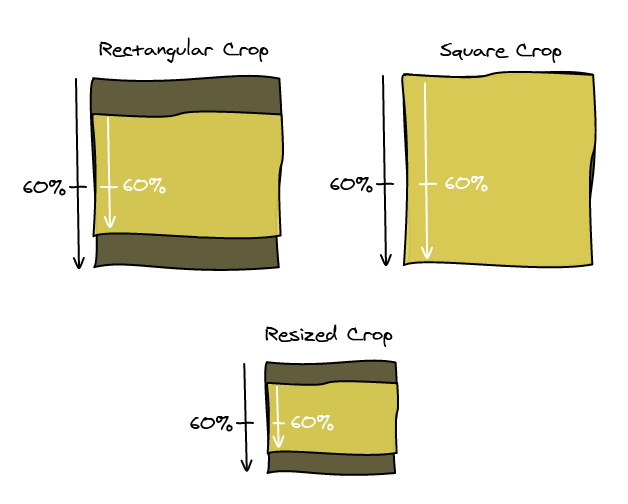
As you can see, this new definition works well with different ratios and scaling.

Horizontal and Vertical

If you pay close attention, you notice that if the image is the same size of the container, the value is ignored. The two axis will be perfectly aligned so all the points will match. Setting 30% or 80% doesn't matter.

If you don't believe the picture, just look at the math.

left = (container_width - image_width) * percentage
left = 0 * percentage
left = 0

The takeaway here is that you need the user to set two values. One when the image is going to scroll vertically. One when the image is going to scroll horizontally.

Conclusion

At first, I didn't understand how percentage values for the background position were working. I was really confused because this is not the way intuitively you would have used percentage.

However, once I tried to implement a robust reposition tool, I realized that this definition of percentage was convenient. It solves in an elegant way many of the issues we had with the usual positioning method.

I hope that you learned something here 🙂

There's one big issue when displaying images inline like smileys is to position them at the right height.

Using vertical-align pre-sets

Usually what you do is try to use vertical-align and test all the possibilities. Then you are frustrated because you can't find the one that is pixel perfect the height you want!

middle , bottom , sub , text-bottom , baseline , text-top , super , top

Using position: relative

What I used to do was to find the nearest vertical-align and then use position: relative; top: -1px; to slightly adjust the vertical position. This works very well, it doesn't change the line-height and sets the image at the exact position you want!

Using vertical-align: number

Until I re-read the documentation for vertical-align ... It appears that we can specify a number instead of the pre-sets! You can just do vertical-align: -2px; and it works. It is relative to the baseline pre-set.

-4px , -3px , -2px , -1px , baseline , 1px , 2px , 3px , 4px

The first non-trivial feature I've done at Facebook is now released 🙂

If you have ever tagged an album, you must know the pain it is to go over all the photos and tag everyone. In order to make this process easier, we can make use of image recognition algorithms to find faces.

How it works

When you click enter tagging mode in the photo viewer, all the detected faces are now being displayed. The first face on the left is automatically selected and you are prompted to enter the name of the person. When you press enter, it automatically goes to the next.

In the ideal case, you can just write the first name, press enter, write the second and so on. Then you press the right arrow key to go to the next photo. You don't have to use your mouse anymore!

Difficulties

This project, strangely, was easy to implement. The difficult part was designing the feature to be user friendly.

Fear of Image Recognition Algorithms

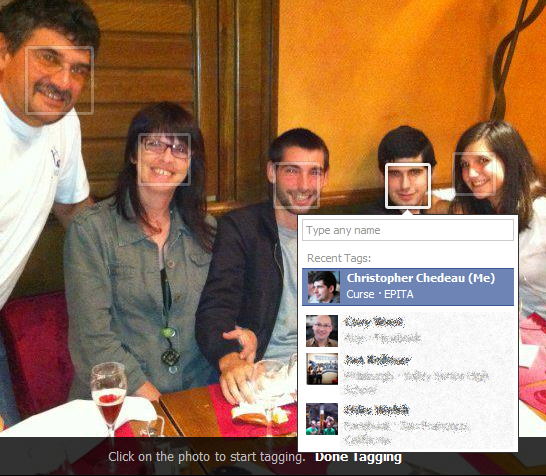
First of all, image recognition algorithms can be frightening. The comparison to 1984 is easy to be made. This is a tough issue to deal with and we've tried our best to use these algorithms in a way that is not creepy.

A typical algorithm has two distinct parts. Detection is the step to find the faces in the image. Recognition is trying to match the face with the person.

Here, we only use detection. We just show boxes where the algorithm thinks there are faces. We do not try to guess who the person is.

Image Recognition Algorithms are Not Perfect

Detecting faces in a picture is an extremely hard problem to solve. The current algorithm works well but is not perfect, and sadly will never be.

The way to deal with it is to make the detected faces a suggestion. The user can at any moment ignore the suggestion and tag anywhere else in the picture. The idea is to make it faster to tag for the most common case, when the algorithm is right. When it is wrong, the user can use the old flow and tag whatever he wants.

From the three months I've been at Facebook, I've seen a strong emphasis to give people control and let them shares things by themselves. Machine learning is used extensively but never to automatically publish things in behalf of the user.

Handling Already Tagged Faces

If the face is already tagged, we don't want to prompt the user to tag the person again. This is tricky to know if a face has already been tagged.

In an ideal world, the tags would be placed centered in the face. However users don't always do that. There are a lot of tags in people's body, feet, hands ... Also, since tags trigger a notification and often a mail to the tagged person, users use tags to send an image with someone. The person isn't even in the photo so no heuristic will help in this case.

We only implement a simple heuristic: if the center of the tag is inside the detected face, we hide the tag. This is going to fail in all the mentioned edge cases but it is not a huge issue in practice. Since we are now going to automatically prompt the user to tag on faces, we are educating them to do so.

Also, most of the tags are done within 24 hours after the image has been uploaded. All the old images with weird cases won't be seen often.

Conclusion

This project was really interesting as it did not only involve technical skills but also a lot of design. I've uploaded several albums since I implemented it and found that it made tagging the entire album more efficient and feel less boring.

This feature also increased the number of tags by few percent, which results in millions of additional tags! Working at Facebook scale is crazy 🙂

When looking at the code of Lightbox.com I remarked that they are not using top and left in order to position their images but margin-top and margin-left. I've been wondering why for some time and finally found the reason.

It is a way to position absolutely elements in a container and preserving the padding property of the container.

Using traditional top and left

As you can see, the position is relative to the top left of the container, completely ignoring padding.

position: relative;
padding: 20px;

position: absolute;
top: 0;
left: 0;
position: absolute;
top: 0;
left: 200px;

Using margin-top and margin-left

And now, with this trick, the position is taking padding into account.

position: absolute;
margin-top: 0;
margin-left: 0;
position: absolute;
margin-top: 0;
margin-left: 200px;
position: relative;
padding: 20px;

Why it works?

When declaring an element position: absolute; and not setting any of top, right, bottom and left, the element is going to be rendered using the normal flow for its position. However, it is not going to be added to the flow.

So if you want it to work, do not insert anything non absolute before the elements and make sure you don't set any of top, right, bottom and left.

Conclusion

This is a neat CSS trick but there's a little side effect when debugging. Inspectors are going to highlight the top left area of the element in orange which may be strange 🙂

Laurent Senta had the opportunity to go to the 5th European Lisp Symposium to present Climb, the project I've been working on during the past 2 years. He did an excellent job at writing a 4-page paper that sums up the interesting parts of the project (Download).

Presentation

I recommend reading the short article before getting to the slides. Download the PPTX if you want to see the speaker text.