In 2001, Douglas Crockford evangelized private members design pattern and since then has been widely adopted by the Javascript community. However, are they really private?

Javascript is an extremely dynamic language in which it is possible to access a lot of things on way or another. We'll see how to get a reference to most of the "private" methods you can find in the wild.

Example

Here's a snippet of code from underscore.js. We are interested in getting a reference to the following "private" functions: lookupIterator and group.

(function() {
  /* ... */
 
  // An internal function to generate lookup iterators.
  var lookupIterator = function(value) {
    return _.isFunction(value) ? value : function(obj){ return obj[value]; };
  };
 
  // An internal function used for aggregate "group by" operations.
  var group = function(obj, value, context, behavior) {
    var result = {};
    var iterator = lookupIterator(value || _.identity);
    each(obj, function(value, index) {
      var key = iterator.call(context, value, index, obj);
      behavior(result, key, value);
    });
    return result;
  };
 
  // Groups the object's values by a criterion. Pass either a string attribute
  // to group by, or a function that returns the criterion.
  _.groupBy = function(obj, value, context) {
    return group(obj, value, context, function(result, key, value) {
      (_.has(result, key) ? result[key] : (result[key] = [])).push(value);
    });
  };
 
  /* ... */
}).call(this);

Here's the code to do it: (Demo on JSFiddle)

var lookupIterator;
var group;
 
_.isFunction = function() {
  lookupIterator = arguments.callee.caller;
  group = lookupIterator.caller;
};
_.groupBy();
 
console.log('lookupIterator', lookupIterator);
console.log('group', group);

The way it works is by hooking a function deep inside the internals of the module you want to break into and use arguments.callee.caller to get references to all the functions upward.

In this case, it was easy as we could hook _.isFunction. You can break into a lot of functions overriding String.prototype and using __defineGetter__.

Conclusion

Trying to break into existing Javascript code and make it do what you want is an extremely fun exercise. If this topic is of interest to you, take a look at this big list of Javascript attack vectors written by Google Caja team.

Daniel Baulig, a co-worker at Facebook, told me a little trick related to jDataView function to convert from a uint8 to a int8 in Javascript.

Here's the version I had:

function getInt8() {
  var b = this.getUint8();
  if (b > Math.pow(2, 7) - 1) {
    return b - Math.pow(2, 8);
  }
  return b;
}

Compare it to his version:

< <function getInt8() {
  return this.getUint8() << 24 >> 24;
}

I was really confused because it seems like it's doing a no-op. Here's the full explanation of why the two versions are working.

How it works?

The following table (borrowed from Wikipedia) shows how various 8 bits values are in represented with bits and how they are interpreted in unsigned and signed (using two-complement rule).

Bits uint8 int8
0000 0000 0 0
0000 0001 1 1
0000 0010 2 2
0111 1110 126 126
0111 1111 127 127
1000 0000 128 −128
1000 0001 129 −127
1000 0010 130 −126
1111 1110 254 −2
1111 1111 255 −1

Javascript doesn't natively have a 8 bit integer type, it only has a 32 bits one. When you put a 8 bit integer into a 32 bits one, Javascript is going to fill the remaining bits on the left with zeros as the following table shows.

Bits int32
0000 0000 ... 0000 0000 0
0000 0000 ... 0000 0001 1
0000 0000 ... 0000 0010 2
0000 0000 ... 0111 1110 126
0000 0000 ... 0111 1111 127
0000 0000 ... 1000 0000 128
0000 0000 ... 1000 0001 129
0000 0000 ... 1000 0010 130
0000 0000 ... 1111 1110 254
0000 0000 ... 1111 1111 255

Unfortunately, this doesn't properly handle negative numbers. Because we use two-complement, we've got to fill all the bits with 1 for negative numbers in order to have the same number in a signed 32 bits representation.

Bits int32
0000 0000 ... 0000 0000 0
0000 0000 ... 0000 0001 1
0000 0000 ... 0000 0010 2
0000 0000 ... 0111 1110 126
0000 0000 ... 0111 1111 127
1111 1111 ... 1000 0000 −128
1111 1111 ... 1000 0001 −127
1111 1111 ... 1000 0010 −126
1111 1111 ... 1111 1110 −2
1111 1111 ... 1111 1111 −1

So basically, we've got to fill the 24 remaining bits on the left with the same first bit we have: 0 for positive numbers and 1 for negative numbers.

This is when the trick comes into place. In javascript, there's a binary operator: >> Sign-propagating right shift that moves all the bits to the right and fills the missing bits with the first bit.

So all we have to do is to put our 8 good digits to the far left using << and then use the previous trick to fill the bits with the proper ones 🙂

x x < < 24 (x << 24) >> 24
0000 0000 ... 0000 0000 0000 0000 ... 0000 0000 0000 0000 ... 0000 0000
0000 0000 ... 0000 0001 0000 0001 ... 0000 0000 0000 0000 ... 0000 0001
0000 0000 ... 0000 0010 0000 0010 ... 0000 0000 0000 0000 ... 0000 0010
0000 0000 ... 0111 1110 0111 1110 ... 0000 0000 0000 0000 ... 0111 1110
0000 0000 ... 0111 1111 0111 1111 ... 0000 0000 0000 0000 ... 0111 1111
0000 0000 ... 1000 0000 1000 0000 ... 0000 0000 1111 1111 ... 1000 0000
0000 0000 ... 1000 0001 1000 0001 ... 0000 0000 1111 1111 ... 1000 0001
0000 0000 ... 1000 0010 1000 0010 ... 0000 0000 1111 1111 ... 1000 0010
0000 0000 ... 1111 1110 1111 1110 ... 0000 0000 1111 1111 ... 1111 1110
0000 0000 ... 1111 1111 1111 1111 ... 0000 0000 1111 1111 ... 1111 1111

It's often said that XML is very verbose and therefore JSON is better. I wanted to challenge that assumption and find the smallest way to represent any JSON value using XML.

Constants
true
<t/> 0
false
<f/> - 1
null
<l/> 0
Number
NaN
<n/> + 1
123.45
<n>123.45</n>
+ 6
String

""
<s/> + 2
"Abcd"
<s>Abcd</s>
+ 4
Array
[]
<a/> + 2
[1, "two", false]
<a>
  <n>1</n>
  <s>two</s>
  <f></f>
</a>
+ 4 - n
Object
{}
<o/> + 2
{
  "first": 1,
  "second": "two",
  "third": false
}
<o>
  <n k="first">1</n>
  <s k="second">two</s>
  <f k="third"></f>
</o>
+ 5 + n

As you can see, the XML counter part is a bit more verbose and less readable because of the way syntax highlighting is setup. However, while it is bigger, it isn't out of proportion bigger. The structure can be at most twice as big.

Implementation

In order to implement it, I decided to go with the same API as JSON:

  • XSON.stringify(object, formatter, space)
  • XSON.parse(string)

You can play with it on this current page or can check it out on GitHub.

The implementation was more straightforward than I expected thanks to the fact that there's a XML Parser inside browsers. However, I had to deal with nasty encoding issues 🙁

String encoding

There are some characters such as < and \0 that we want to escape because otherwise they are likely to be problematic while parsing the XML. The way to encode those characters in XML is to use the &#number; notation where number is the character code. For example a is represented by a:

> new DOMParser().parseFromString('<a>&#97;</a>', 'text/xml')
    .getElementsByTagName('a')[0].textContent
"a"

Unfortunately, you cannot express all the characters with this notation. The XML specification introduces Restricted Characters in the following ranges: [#x1-#x8], [#xB-#xC], [#xE-#x1F], [#x7F-#x84] and [#x86-#x9F]. When you try to read those characters, then the XML parser generates an error.

> new DOMParser().parseFromString('<a>&#0;</a>', 'text/xml')
    .getElementsByTagName('a')[0].textContent
"error on line 1 at column 8: xmlParseCharRef: invalid xmlChar value 0"

Instead of fighting with the XML spec, I decided to use my own encoding. I replace the character by \u0000. Where the number is an hexadecimal representation of the number padding so it has exactly four digits.

To do that, we need first to escape all the \ and can use a regex to do it in few lines of code 🙂

function encode(str) {
   return str
     .replace(/\\/g, '\\\\')
     .replace(/[\u0000-\u0008\u000b-\u001f&<>"\n\t]/g, function(c) {
       var hex = c.charCodeAt(0).toString(16);
       while (hex.length < 4) {
         hex = '0' + hex;
       }
       return '\\u' + hex;
     });
 }

Then, in order to decode it, we do the opposite: we first decode all the unicode characters and remove the escapes. In order to make sure that the unicode character was not escape, I'm using a small trick. You can count the number of \. If it's an even number, then it is not escaped, otherwise it is escaped!

function decode(str) {
  return str
    .replace(/(\\*)\\u([0-9a-f]{4})/g, function(match, backslash, n) {
      if (backslash.length % 2 !== 0) {
        return match;
      }
      return backslash + String.fromCharCode(parseInt(n, 16));
    })
    .replace(/\\\\/g, '\\');
}

I'm working on an application in the browser that lets you take notes. I don't want to have the burden to save them on my own server therefore I want to use Github Gists as storage. The challenge is to be able to communicate with the Github API 100% inside the browser.

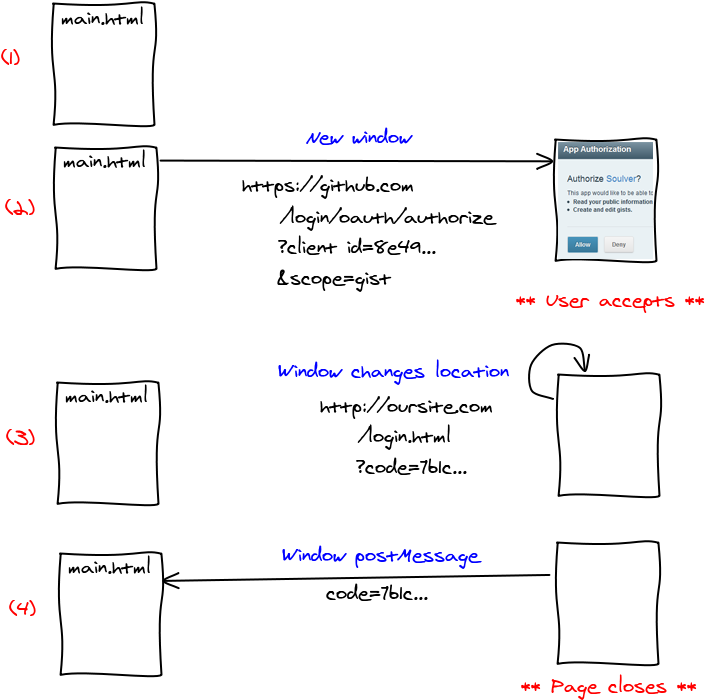
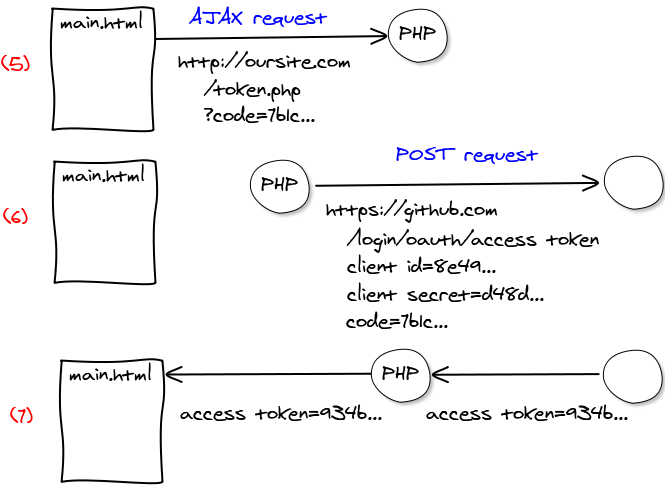
Since it is a difficult task due to Cross-origin resource sharing limitations and multi-step OAuth process, I decided to share with you a working procedure I found. It involves different communication protocols such as HTTP Redirect, window.postMessage, Ajax post and get and a small PHP proxy using cURL.

Login Phase

Phase 0 - Create an application

Before doing anything, you have to create a Github application. It will provide you the client_id and client_secret as well as an admin to put the redirect URL.

Phase 1 - Get authentication code

Using Github API OAuth guide we learn that we have to redirect the user to a page on github server. After the user authorizes the application, the page is redirected to one of our page with a code.

Since we do not want to leave the current page (it would make all the user changes vanish) we must open the page in another context. The first one I tried was an iframe but github has the X-Frame-Options header set that prevents embedding the page in the iframe.

So the other option was to open a new window. With window.open it was really easy to do so. The only tricky part was to actually give back the result to the main window. After digging, I found the following snippet of code that works well: window.opener.postMessage(message, window.location).

Phase 2 - Get access token

We are back in the main window and have the code. We now need to exchange this code for a token. I really wonder why they didn't give us the token already but well, there must be a reason! In order to get the token, we must send a POST request to a page on github.

However another difficulty comes in, this one page does not have a Access-Control-Allow-Origin header set to our domain. So basically, we cannot access it from the browser using AJAX. Since it's a POST request, we cannot even use JSON-P to bypass it.

I did not want to have a server but I am resigned to write a small PHP proxy that will forward the call. I believe that the main reason why they blocked it was because they ask for the client_secret. They don't want us to write it down in our Javascript in plain sight.

Phase 3 - Enjoy!

Now that we have got our token, we can call all the APIs on Github using post and get AJAX requests and they all work fine. One good thing is the fact that the token is permanent. Unless you change the permissions you request or the user revokes your application, every time the user logs in, he will be associated the same token.

You can safely store the token in the user's browser with localStorage in order to keep them logged when they come back to the application. Just make sure to catch 401 Unauthorized error on requests in case the token is no longer valid and ask the user to log in again.

Demo

And here's the demo! The source code is really small and available on github. If you plan to integrate an in-browser login, it can be used as a starting point.

You might want the link to revoke the access from the dummy application for testing purposes.

Conclusion

At first glance, the login process seemed to be really straightforward, you just had 2 requests to get your code and token and you are good to go. But doing so in the browser revealed itself to be a lot harder. I'm not satisfied with the process as it involves many different technologies but that's the best I could find. If you handled things differently please tell me 🙂

I recently had the chance to do a 2-hour Javascript evangelism talk at Dassault Systèmes. Unfortunately the presentation has not been recorded. I reused my the presentation I did at EPITA at the beginning and added a second part with a lot of demos. I've written down notes about the second part so you can get an idea.

Developer Tools

  • Web Inspector. It is integrated into Google Chrome and has all the features you would be expecting in an IDE. The console is really powerful as it lets you browse through the Javascript objects. You no longer need to write endless printing functions. You can edit the HTML and CSS without a page reload, it makes designing interfaces a lot more efficient. There is also a full panel dedicated to profiling both Javascript and DOM events.
  • JSFiddle. Web programming is all about interactivity. Not only you with the program (REPL) but also with other people. Everything you do can be one link away. JSFiddle lets you try and experiment things without the need of an IDE and allows you to show it to the world easily.
  • JSHint. Because Javascript, the language, has design issues and is highly dynamic, it is useful to enforce good practices and to set common programming rules when working together. Always in the spirit of the web, you can just copy and paste your code to check it. Note that JSHint can also be integrated in all major text editors and IDEs.

CSS

HTML and CSS were traditionally used to make websites and forms. We can now make completely different things.

  • jmpress.js. Here's an example of how to use 3D in CSS in order to make animated presentation. One important thing to notice is how easy it is to use it. Just include jmpress.js in the page and add data-x="-5000" data-rotate="180" attributes to your HTML. It just works!
  • CSS Panic. In order to show how powerful CSS got those days, here's a game completely written in HTML + CSS. There is 0 lines of Javascript!

Canvas

Canvas is just a rectangle where you can manipulate each pixel's color.

  • RayTracer. Ray Tracer is a common computer science school project. Usually, you write it on your computer and sometimes share the resulting image but you don't really share it because no one want to take the pain of compiling it on their machine. With Javascript, you can just share a link and everyone can test it!
  • Canvas Rider. You can now create games in the browser. There is even a level editor implemented that follows principle of the web: interactivity. You can draw the map and move your character at the same time. When you are done, you are a single click away from saving the map and sharing it to people.
  • pdf.js. The browser is now able to create applications that have always been restricted to native ones. The perfect example is this demo by Mozilla of a pdf renderer written exclusively in Javascript!

SVG

SVG let you manipulate vector graphics such as line, curve, circle ...

  • Cloth Simulation. Javascript implementations have gotten fast enough to do real time constraint solving simulations such as this one. It uses SVG to easily render the graph.
  • Simulated Annealing. It's another school project that gains from being written in the web. This would have probably been written in console mode, using ascii art and generating images as output. The parameters would have been entered in the command line. We can instead exploit HTML to make forms that update in real time, and SVG to render the problem and a graph to display the progress.

WebGL

WebGL is an implementation of OpenGL in the browser. It let us use the graphical card from Javascript.

  • 3D Simulated Annealing. Same as previous demo but this time there is a 3D representation of the progress. It also follows the interactivity rule, you can use your mouse and WASD to explore the scene. This demo uses Web Workers to exploit multiple cores.
  • WebGL Maps. The graphical card is dedicated to manipulate images, therefore you can use it to improve performance on image intensive applications such as Google Maps.
  • Bevelity. Ever wondered if it was possible to write a complex application such as 3DSMax in the browser? Bevelity is an attempt to prove it true.
  • Water Simulation. Another physics simulation demo with always the web plus: you can move the ball 🙂
  • Hello Racer. This is one of the thousand demos that shows you a beautiful car with glossy reflects ... This one has a unique feature: you can move the car! This must not have taken more than a few dozens of lines and yet has a huge impact!
  • Morph Target. Pixar also find uses for the web. Here's a demo to create facial expressions.
  • Rome. Browsers now embed a video tag. Using it in combination with WebGL, Google made a wonderful 3-minute animation. You can use the mouse to interact with it. It moves the camera, pixelate the video and even make appear various monsters.

Performance

Javascript performance are impressively improving from months to months. It is now possible to write computing intensive programs and make them run at decent speed.

  • JSPerf. If you have a doubt on which browser is faster for a specific feature or when you have two ways to do things, which one is faster, JSPerf is made for you!
  • JSLinux. Typed Arrays introduced for WebGL made possible to write a CPU Virtual Machine able to run a copy of linux in under 7 seconds.
  • repl.it. Emscriptem is a wonderful tool that translates LLVM assembly code into Javascript. It made possible to compile Ruby, Python, Lua and Scheme directly from their sources to Javascript.
  • Broadway. Last but not least, a H.264 video decoder has been compiled to Javascript using Emscriptem. It manages to decode the sample videos at 60 frames per second. This is an exceptional feat for a scripting language!

Conclusion

It is now possible to write the same complex applications we seen in the past in the browser. And it gives one huge added value: interactivity. There's absolutely nothing to install, you just have to give a link! You can combine all the render options such as HTML, CSS, Canvas, SVG and WebGL to make your program.

The next talk I'm going to do is at the JSConf! I hope to see you there!