This is a very thought-provoking talk that attempts to show that CSS has fundamental flaws and writing styling in JS solves most of the problem without even trying.
Nov
15
React has managed to be successful at scale thanks to the fact that it makes finding the root cause of bugs easier through various mechanisms that I explain in this talk.
Jul
02
I was reading about text layout algorithms when I found a striking parallel with Google Plus image layout algorithm. This blog article explains how to find the best line breaks for the image layout.
Line Breaking Algorithm
“Breaking Paragraphs into Lines” article written in 1980 by Donald Knuth and Michael Plass explain how to find the best line breaks in order to make justified text look pretty. The goal is to find where to put line breaks on this paragraph:
In olden times when wishing still helped one, there lived a king
whose daughters were all beautiful; and the youngest was so
beautiful that the sun itself, which has seen so much, was aston-
ished whenever it shone in her face. Close by the king’s castle lay
a great dark forest, and under an old lime-tree in the forest was
a well, and when the day was very warm, the king’s child went
out into the forest and sat down by the side of the cool fountain;
and when she was bored she took a golden ball, and threw it up
on high and caught it; and this ball was her favorite plaything.
The first thing to notice is that you cannot break everywhere. In bold, are all the words that can be end of lines while maintaining the constraint of reasonably stretching white spaces in the line.
The first line only has two allowed words while the line before last line has seven. However, the seven are not allowed at the same time, each of them depend on the previous breaks configuration. You can draw a graph that shows all the possible breaks configurations.
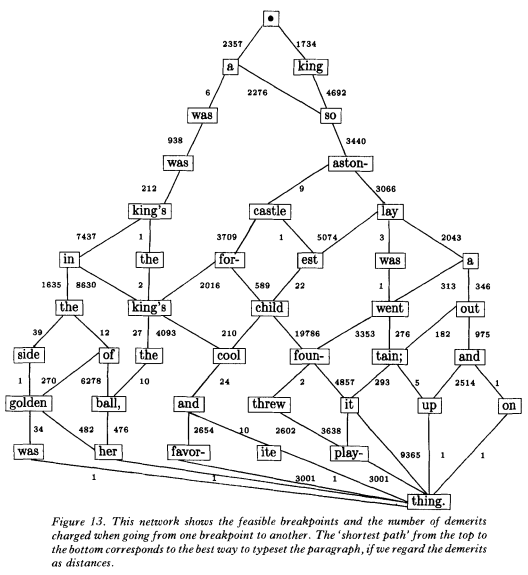
Each transition in this graph represents a line of text (between two breaks). If you can give a fitness value to each line, then you can apply a shortest path algorithm on the graph to find the best breaks configuration. The rest of the article studies a flexible fitness framework that covers all major text layout constraints, but that will not be of any help for our problem.
Parallel with Image Layout
Let’s say we want to layout the following five images:

There are many ways to split the images into lines. Here is an exhaustive list of the lines we can have for our five images:
1 12 2 123 23 3 1234 234 34 4 12345 2345 345 45 |
And, we need to link the lines such that they form 12345 at the end. For example 1-2-3-4-5, 12345, 123-4-5 … I’ve drawn the full graph so you get an idea of what it looks like:
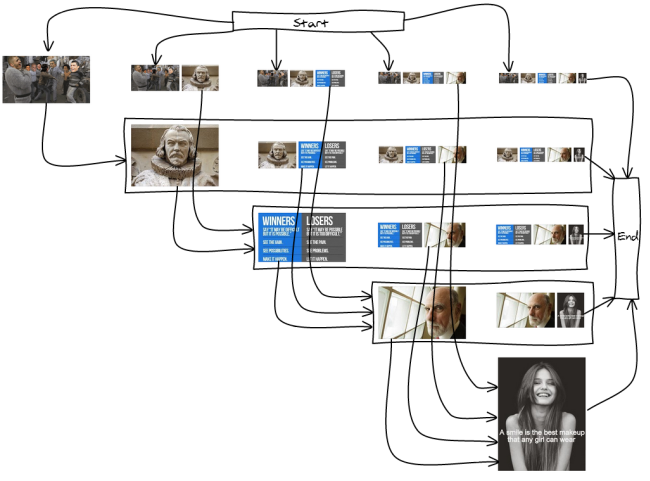
Like in the line breaking algorithm for text, not all the break positions are wanted. Having only one image would make it way too big, having more than three would make them too small. So we’re going to remove them from the graph.
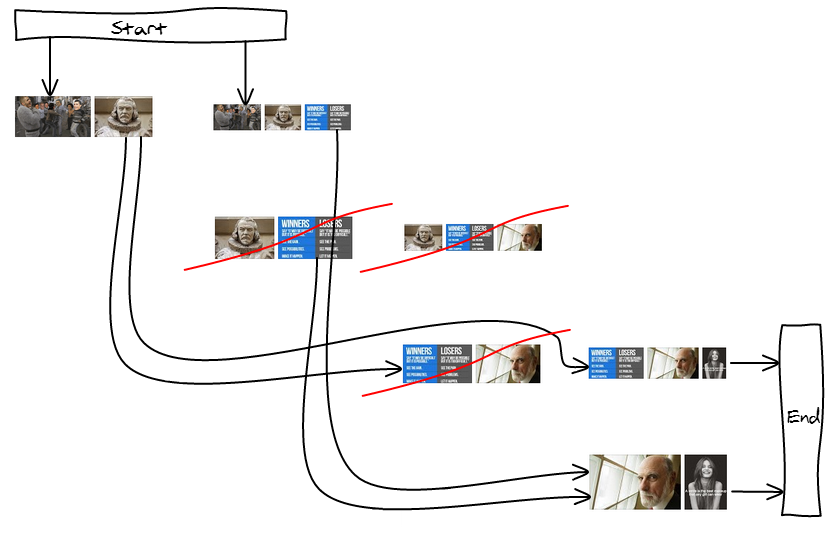
By disallowing some lines, some nodes are now unreachable, trimming down the graph as well. In our example, we are left with only two valid layouts: 123-45 and 12-345.

Cost Metrics
I found it very hard to visually evaluate two layouts. Most of the time, you can easily spot extreme things you don’t want such as a giant image or too many small ones. Then, the goal of the cost metric is to minimize the number of those occurrences.
Max height
The first approach tries to respect the constraints of the first-fit heuristic: as soon as the height goes below a threshold, we display the images. We therefore have a MAX_HEIGHT constant that no line can go above.
Because the graph is acyclic, we can use Dijkstra shortest path algorithm to find the longest path (Proof), we just have to return negative costs.
function cost(images, i, j) { var height = compute_height(images, i, j); if (height > MAX_HEIGHT) { return null; } // Maximize the number of breaks return -1; // Maximize the total height return -height; // Maximize the average image height return -(height * (j - i)); } |
// Maximize the number of breaks
return -1;
// Maximize the total height
return -height;
// Maximize the average image height
return -(height * (j – i));
}
Target Height
The other approach is to have a target height per line and try to have all the lines as close as possible to the target. The function should return 0 when the line is exactly the size of the target line.
We can write several versions that are going to weight errors differently. You can have a greater variance with a more precise mean, or the opposite. You can prefer being a bit bigger than smaller …
function cost(images, i, j) { var height = compute_height(images, i, j); // Minimize the total height difference from the target return Math.abs(TARGET_HEIGHT - height); // Minimize the difference to the target and // penalize more harshly big differences return Math.pow(TARGET_HEIGHT - height, 2); // Minimize the difference area from the target var diff = 0; for (; i < = j; ++i) { var ratio = images[i].width / images[i].height; var target_area = TARGET_HEIGHT * TARGET_HEIGHT * ratio; var area = height * height * ratio; diff += Math.abs(target_area - area); } return diff; } |
// Minimize the total height difference from the target
return Math.abs(TARGET_HEIGHT – height);
// Minimize the difference to the target and
// penalize more harshly big differences
return Math.pow(TARGET_HEIGHT – height, 2);
// Minimize the difference area from the target
var diff = 0;
for (; i < = j; ++i) {
var ratio = images[i].width / images[i].height;
var target_area = TARGET_HEIGHT * TARGET_HEIGHT * ratio;
var area = height * height * ratio;
diff += Math.abs(target_area – area);
}
return diff;
}
Conclusion
Check-out the first-fit demo versus best break demo (using cost = (target_height - height)^2)
Thanks to an unrelated reading, I’ve been able to draw a parallel between text display and image layout. Who would have thought that graph theory would be involved there too 🙂
We can now find the best layout at a cheap cost (nearly-linear with the number of images if you only allow a small number of possible breaks per line). The cost metric allow you to easily disallow patterns you find bad looking.
May
02
In this talk I give an overview of the big categories of image layout algorithms with examples for each of them and present criterias to look at when evaluating them.
Apr
29
I’m implementing a layout algorithm in C and want to let the user specify a callback to compute the height based on the width.
Using function pointers, we can provide the callback:
typedef struct { float (*measure)(float width); } layout_node_t; void layout(layout_node_t *node) { float width = 10; float height = node->measure(width); } |
void layout(layout_node_t *node) {
float width = 10;
float height = node->measure(width);
}
It works well if we have a function measure that only uses global variables:
float measure(float width) { return width * 2; } int main() { layout_node_t node; node.measure = measure; layout(&node); } |
int main() {
layout_node_t node;
node.measure = measure;
layout(&node);
}
However, I would like my measure function to take some dynamic input. For example in order to measure an image, you need to take its aspect ratio into account. In JavaScript, I would write the following:
var aspect_ratio = 1.5; node.measure = function mesure_image(width) { return width * aspect_ratio; } |
Unfortunately, C doesn’t support closures. I haven’t been able to find a way to get a function pointer alone somehow hold some state. The best trade-off I found was to have a void * metadata in the struct and pass it along with the function call. (Thanks Scott and Felix for the help!)
typedef struct { float (*measure)(void *context, float width); void *measure_context; } layout_node_t; void layout(layout_node_t *node) { float width = 10; float height = node->measure(node->measure_context, width); } |
void layout(layout_node_t *node) {
float width = 10;
float height = node->measure(node->measure_context, width);
}
The void * value lets us put anything we want in it. So, with some casting we are able to simulate a closure and write our measure_image function 🙂
float measure_image(void *context, float width) { float aspect_ratio = *(float *)context; return width / aspect_ratio; } int main() { layout_node_t node; node.measure = measure_image; float aspect_ratio = 1.5; node.measure_context = (void *)&aspect_ratio; layout(&node); } |
int main() {
layout_node_t node;
node.measure = measure_image;
float aspect_ratio = 1.5;
node.measure_context = (void *)&aspect_ratio;
layout(&node);
}
To compute the height of the image we use a float, but in order to handle text, we can pass a const char * instead. It works as well!
float measure_text(void *content, float width) { const char *text = (const char *)content; float line_height = 11; return ceil(strlen(text) / width) * line_height; } int main() { layout_node_t node; node.measure = measure_text; node.measure_context = (void *)"this is some super long text"; layout(&node); } |
int main() {
layout_node_t node;
node.measure = measure_text;
node.measure_context = (void *)"this is some super long text";
layout(&node);
}
This solves the use case pretty well, which is remarkable since C doesn’t support closure. The downside is that we are losing all the type information, have to do a lot of type casting and renaming.
Apr
03
PHP and JavaScript are both renowned to be languages with a lot of quirks. However two major initiatives on both sides, Hack for PHP and ES6 for JavaScript made the languages much better and modern. In this article I’m going to show all the ES6 features that are also in Hack.
Arrow Function
Both languages adopted the same shorter way to write functions. On JavaScript side, the main advantage is the automatic binding of this and for PHP it removes the need to declare all the variables you want to use from outside. ES6, Hack.
// JavaScript var odds = evens.map(v => v + 1); var nums = evens.map((v, i) => v + i); nums.filter(v => { if (v % 5 === 0) { console.log(v); return true; } return false; }); |
// Hack $odds = array_map($v ==> $v + 1, $evens); $nums = array_map(($v, $i) ==> $v + $i, $evens); array_filter($nums, $v ==> { if ($v % 5 === 0) { echo $v; return true; } return false; }); |
Class
JavaScript finally gets a class abstraction with ES6. It is however the bare minimal one to be useful, you cannot define constants, protected/private methods, traits … PHP on this side is much better, without any Hack addition. ES6, PHP5.
// JavaScript class SkinnedMesh extends THREE.Mesh { constructor(geometry, materials) { super(geometry, materials); this.idMatrix = SkinnedMesh.defaultMatrix(); this.bones = []; } update(camera) { super.update(); } static defaultMatrix() { return new THREE.Matrix4(); } } |
// Hack class SkinnedMesh extends THREEMesh { public function constructor($geometry, $materials) { parent::__construct($geometry, $materials); $this->idMatrix = SkinnedMesh::defaultMatrix(); $this->bones = array(); } public function update($camera) { parent::update(); } static private function defaultMatrix() { return new THREEMatrix4(); } } |
Enhanced Object Literal
One long standing issue with object literals in JavaScript is the inability to use an expression as a key. This is fixed with the bracket notation in ES6. PHP 5.4 introduced a short notation for arrays as well. ES6, PHP.
// JavaScript var obj = { [Math.random()]: true }; |
// Hack $obj = [rand() => true]; |
Template Strings
Multiline strings and variable interpolations are something that have always been possible in PHP, yet they only start to work in ES6! ES6, PHP.
// JavaScript var multiline = `In JavaScript this is not legal.` var name = 'Bob', time = 'today'; `Hello ${name}, how are you ${time}?` |
// Hack $multiline = 'In PHP this is legal.'; $name = 'Bob'; $time = 'today'; "Hello $name, how are you $time?"; |
Default Arguments
It was possible to write default arguments in JavaScript but ES6 adds proper support for it right in the function declaration. Guess what, PHP had support for it all along. ES6, PHP.
// JavaScript function f(x, y=12) { return x + y; } f(3) === 15; f(2, 10) === 12; |
// Hack function f($x, $y=12) { return $x + $y; } f(3) === 15; f(2, 10) === 12; |
Iterator + for of
JavaScript has two ways to iterate on collections, either
for (var i = 0; i < array.length; ++i) { var element = array[i]; /* ... */ } for (var key in object) { var element = object[key]; /* ... */ } |
ES6 is now introducing a unified way to do iteration, that PHP always had, as well as a way to write custom collections via the iterator pattern, introduced in PHP5. ES6, PHP, PHP5.
// JavaScript var fibonacci = { [Symbol.iterator]: function() { var previous = 0; var current = 1; return { next: function() { var new_previous = current; current += previous; previous = new_previous; return { value: current, done: false } } } } } for (var n of fibonacci) { if (n > 1000) break; console.log(n); } |
return {
value: current,
done: false
}
}
}
}
}
for (var n of fibonacci) {
if (n > 1000) break;
console.log(n);
}
// Hack class Fibonacci implements Iterator { private $key = 0; private $previous = 1; private $current = 0; public function next() { $new_previous = $this->current; $this->current += $this->previous; $this->previous = $new_previous; $this->key++; } public function current() { return $this->current; } public function valid() { return true; } public function key() { return $this->key; } public function rewind() { $this->previous = 1; $this->current = 0; $this->key = 0; } } foreach (new Fibonacci() as $n) { if ($n > 1000) break; echo $n; } |
public function next() {
$new_previous = $this->current;
$this->current += $this->previous;
$this->previous = $new_previous;
$this->key++;
}
public function current() {
return $this->current;
}
public function valid() {
return true;
}
public function key() {
return $this->key;
}
public function rewind() {
$this->previous = 1;
$this->current = 0;
$this->key = 0;
}
}
foreach (new Fibonacci() as $n) {
if ($n > 1000) break;
echo $n;
}
Generators
Python pioneered generators as another tool to manage control flow. It has originally been designed and promoted as an easier way to write iterators, but really shined as a better way to write asynchronous operations than callbacks. ES6, PHP5.
// JavaScript var fibonacci = { [Symbol.iterator]: function*() { var previous = 1; var current = 0; for (;;) { var new_previous = current; current += previous; previous = new_previous; yield current; } } } for (var n of fibonacci) { if (n > 1000) break; console.log(n); } |
// Hack function fibonacci() { $previous = 1; $current = 0; for (;;) { $new_previous = $current; $current += $previous; $previous = $new_previous; yield $current; } } foreach (fibonacci() as $n) { if ($n > 1000) break; echo $n; } |
function fibonacci() {
$previous = 1;
$current = 0;
for (;;) {
$new_previous = $current;
$current += $previous;
$previous = $new_previous;
yield $current;
}
}
foreach (fibonacci() as $n) {
if ($n > 1000) break;
echo $n;
}
ES7 Async Await
C# introduced the concept of async/await combination to deal with asynchronous programming. The underlying implementation is very similar to generators but has proper syntax support. It is an addition of Hack on-top of PHP. ES7, Hack.
// JavaScript async function chainAnimationsAsync(element, animations) { var result = null; try { for (var animation in animations) { result = await animation(element); } } catch (e) { /* ignore and keep going */ } return result; } |
// Hack async function chainAnimationsAsync($element, $animations) { $result = null; try { foreach ($animations as $animation) { $result = await animation($element); } } catch (Exception $e) { /* ignore and keep going */ } return $result; } |
Map + Set
Both JavaScript and PHP are notorious for attempting to fit all the collection use cases into a single general purpose type. Both ES6 and Hack bring to the table proper support for Map and Set. ES6, Hack
// JavaScript var s = new Set(); s.add('hello').add('goodbye').add('hello'); s.size === 2; s.has('hello') === true; var m = new Map(); m.set('hello', 42); m.get('hello') === 42; |
var m = new Map();
m.set(‘hello’, 42);
m.get(‘hello’) === 42;
// Hack $s = new Set(); $s->add('hello')->add('goodbye')->add('hello'); $s->count() === 2; $s->contains('hello') === true; $m = new Map(); $m->set('hello', 42); $m->get('hello') === 42; |
$m = new Map();
$m->set(‘hello’, 42);
$m->get(‘hello’) === 42;
TypeScript
Last but not least, both languages are getting gradual typing. TypeScript, Hack.
// JavaScript class Greeter { greeting: T; constructor(message: T) { this.greeting = message; } greet() { return this.greeting; } } var greeter = new Greeter("Hello, world"); console.log(greeter->greet()); |
var greeter = new Greeter("Hello, world");
console.log(greeter->greet());
// Hack class Greeter { public function __construct(private T $greeting) {} public function greet() { return $this->greeting; } } $greeter = new Greeter("Hello, world"); echo $greeter->greet(); |
public function __construct(private T $greeting) {}
public function greet() {
return $this->greeting;
}
}
$greeter = new Greeter("Hello, world");
echo $greeter->greet();
Conclusion
With ES6 and Hack efforts, JavaScript and PHP are becoming languages with modern features. If you tried them 5 years ago, you should take another look, they are not as crappy as they once were 🙂
A cyber security provider’s main task is to protect your business from all forms of cyber-attacks. If and when an attack happens, https://www.sapphire.net/ will know exactly what to do.
Dec
28
Originally posted on Perf Planet.
React is a JavaScript library for building user interfaces developed by Facebook. It has been designed from the ground up with performance in mind. In this article I will present how the diff algorithm and rendering work in React so you can optimize your own apps.
Diff Algorithm
Before we go into the implementation details it is important to get an overview of how React works.
var MyComponent = React.createClass({ render: function() { if (this.props.first) { return <div className="first"><span>A Span</span></div>; } else { return <div className="second"><p>A Paragraph</p></div>; } } }); |
At any point in time, you describe how you want your UI to look like. It is important to understand that the result of render is not an actual DOM node. Those are just lightweight JavaScript objects. We call them the virtual DOM.
React is going to use this representation to try to find the minimum number of steps to go from the previous render to the next. For example, if we mount <MyComponent first={true} />, replace it with <MyComponent first={false} />, then unmount it, here are the DOM instructions that result:
None to first
- Create node:
<div className="first"><span>A Span</span></div>First to second
- Replace attribute:
className="first"byclassName="second"- Replace node:
<span>A Span</span>by<p>A Paragraph</p>Second to none
- Remove node:
<div className="second"><p>A Paragraph</p></div>
Level by Level
Finding the minimal number of modifications between two arbitrary trees is a O(n4) problem. As you can imagine, this isn’t tractable for our use case. React uses simple and yet powerful heuristics to find a very good approximation in O(n).
React only tries to reconcile trees level by level. This drastically reduces the complexity and isn’t a big loss as it is very rare in web applications to have a component being moved to a different level in the tree. They usually only move laterally among children.

List
Let say that we have a component that on one iteration renders 5 components and the next inserts a new component in the middle of the list. This would be really hard with just this information to know how to do the mapping between the two lists of components.
By default, React associates the first component of the previous list with the first component of the next list, etc. You can provide a key attribute in order to help React figure out the mapping. In practice, this is usually easy to find out a unique key among the children.

Components
A React app is usually composed of many user defined components that eventually turns into a tree composed mainly of divs. This additional information is being taken into account by the diff algorithm as React will match only components with the same class.
For example if a <Header> is replaced by an <ExampleBlock>, React will remove the header and create an example block. We don’t need to spend precious time trying to match two components that are unlikely to have any resemblance.

<!–
Creation
The first step of the lifecycle of a component is to generate its markup and insert it in the DOM. There are two ways to do that, either creating and wiring up all the elements via the DOM API or generating a giant string of markup and insert it using innerHTML.
We found that using the DOM API is prohibitively expensive on older versions of Internet Explorer. While modern browsers do a lot better, it is still slower than using innerHTML. Using innerHTML isn’t a panacea though, it exposes us to many hard-to-solve XSS issues.
The simple reason why innerHTML is faster is that the DOM API is written in C++ and repeatedly switching between C++ and JavaScript turns out to be slow.
If you have twenty isolated markup islands, we create them all in one shot using innerHTML only once then put them all in their separate places.

Mutation
A component can change while it is in the DOM. An attribute can be modified, the innerText updated, a child removed … In this phase, we use the DOM API.
innerHTML worked great in the previous phase because we could easily batch a lot of updates into a single DOM API call. In this case, only parts of existing components are updated. There aren’t any APIs such as innerHTML to send a batch of small changes.
We could still regenerate the tree as it worked well in the first case. This is however not the wisest decision. At this point, the browser has already generated many internal data structures for that DOM node (render, layout and paint trees). Recreating them is rather expensive.
The DOM also has state that is hard to properly replicate such as the element being focused, the scroll position (with physics), the cursor and selected text … It’s in our best interest not to destroy DOM nodes and instead to move them around when possible.
–>
Event Delegation
Attaching event listeners to DOM nodes is painfully slow and memory-consuming. Instead, React implements a popular technique called “event delegation”. React goes even further and re-implements a W3C compliant event system. This means that Internet Explorer 8 event-handling bugs are a thing of the past and all the event names are consistent across browsers.
Let me explain how it’s implemented. A single event listener is attached to the root of the document. When an event is fired, the browser gives us the target DOM node. In order to propagate the event through the DOM hierarchy, React doesn’t iterate on the virtual DOM hierarchy.
Instead we use the fact that every React component has a unique id that encodes the hierarchy. We can use simple string manipulation to get the id of all the parents. By storing the events in a hash map, we found that it performed better than attaching them to the virtual DOM. Here is an example of what happens when an event is dispatched through the virtual DOM.
// dispatchEvent('click', 'a.b.c', event) clickCaptureListeners['a'](event); clickCaptureListeners['a.b'](event); clickCaptureListeners['a.b.c'](event); clickBubbleListeners['a.b.c'](event); clickBubbleListeners['a.b'](event); clickBubbleListeners['a'](event); |
The browser creates a new event object for each event and each listener. This has the nice property that you can keep a reference of the event object or even modify it. However, this means doing a high number of memory allocations. React at startup allocates a pool of those objects. Whenever an event object is needed, it is reused from that pool. This dramatically reduces garbage collection.
Rendering
Batching
Whenever you call setState on a component, React will mark it as dirty. At the end of the event loop, React looks at all the dirty components and re-renders them.
This batching means that during an event loop, there is exactly one time when the DOM is being updated. This property is key to building a performant app and yet is extremely difficult to obtain using commonly written JavaScript. In a React application, you get it by default.

Sub-tree Rendering
When setState is called, the component rebuilds the virtual DOM for its children. If you call setState on the root element, then the entire React app is re-rendered. All the components, even if they didn’t change, will have their render method called. This may sound scary and inefficient but in practice, this works fine because we’re not touching the actual DOM.
First of all, we are talking about displaying the user interface. Because screen space is limited, you’re usually displaying on the orders of hundreds to thousands of elements at a time. JavaScript has gotten fast enough business logic for the whole interface is manageable.
Another important point is that when writing React code, you usually don’t call setState on the root node every time something changes. You call it on the component that received the change event or couple of components above. You very rarely go all the way to the top. This means that changes are localized to where the user interacts.

Selective Sub-tree Rendering
Finally, you have the possibility to prevent some sub-trees to re-render. If you implement the following method on a component:
boolean shouldComponentUpdate(object nextProps, object nextState) |
based on the previous and next props/state of the component, you can tell React that this component did not change and it is not necessary to re-render it. When properly implemented, this can give you huge performance improvements.
In order to be able to use it, you have to have to be able to compare JavaScript objects. There are many issues that raises such as should the comparison be shallow or deep; if it’s deep should we use immutable data structures or do deep copies.
And you want to keep in mind that this function is going to be called all the time, so you want to make sure that it takes less time to compute that heuristic than the time it would have taken to render the component, even if re-rendering was not strictly needed.

Conclusion
The techniques that make React fast are not new. We’ve known for a long time that touching the DOM is expensive, you should batch write and read operations, event delegation is faster …
People still talk about them because in practice, they are very hard to implement in regular JavaScript code. What makes React stand out is that all those optimizations happen by default. This makes it hard to shoot yourself in the foot and make your app slow.
The performance cost model of React is also very simple to understand: every setState re-renders the whole sub-tree. If you want to squeeze out performance, call setState as low as possible and use shouldComponentUpdate to prevent re-rendering an large sub-tree.
Nov
27
E4X (ECMAScript for XML) is a Javascript syntax extension and a runtime to manipulate XML. It was promoted by Mozilla but failed to become mainstream and is now deprecated. JSX was inspired by E4X. In this article, I’m going to go over all the features of E4X and explain the design decisions behind JSX.
Historical Context
E4X has been created in 2002 by John Schneider. This was the golden age of XML where it was being used for everything: data, configuration files, code, interfaces (DOM) … E4X was first implemented inside of Rhino, a Javascript implementation from Mozilla written in Java.
At the time, a very common operation was to transform XML documents into other XML documents, especially in the Java world. The two major ways to do that were either XSLT or the DOM API. Both those technologies suffer from very bad reputation as they are very tedious to work with.
Since then, the Javascript landscape evolved and the assumptions E4X was developed under do not hold true anymore. JSON has now largely replaced XML to represent data and JSON can be manipulated natively within Javascript. Libraries like jQuery made DOM searching, filtering and basic manipulation a lot easier thank to CSS selectors.
Creating a DOM structure is the only major problem that is still not properly solved. Current solutions involve creating a different “templating” language language (Mustache, Jade), creating a poor man’s DSL (MagicDOM) or to use HTML modified with special attributes (Angular). This is the problem JSX is trying to solve.
The Good Parts
XML syntax is particularly good at expressing interfaces. Many people (including myself) have tried to create pure Javascript libraries that have a syntax similar to XML but none of them look really good.
With E4X, you can write XML within Javascript like this:
var header = <div> <h1><a href="/">Vjeux</a></h1> <h2>French Web Developer</h2> </div>; |
The real power of E4X comes from the interpolation mechanism. You can write Javascript expressions within {}. This lets you write dynamic HTML.
var links = [ {name: 'Talks & Written Reports', url: '/reports'}, {name: 'Contact', url: '/contact/'} ]; var body = <body> {header} <div class="left_nav"> <input type="text" name="search" /> <h2>About Me</h2> <ul>{section.elements.map(function(element) { var isActive = element.url == window.location; return <li class={isActive ? 'active' : ''}> {isActive ? element.name : <a href={element.url}>{element.name}</a> } </li>; })}</ul> </div> </body> |
This example shows that this simple construct coupled with Javascript can solve what templates have been designed to.
- partials:
headerhas been defined somewhere else and the resulting DOM node is just being included. In this caseheaderwas just a variable but I could as easily have used a function call to create it. - lists: The result of the interpolation can be a Javascript array. In order to create it, you can use the default
map,filter, or any Javascript library that manipulate arrays (like Underscore for example). - conditions: Again, I don’t need a special syntax here, Javascript already has the ternary operator. For more complex conditions you can call a function that will contain if/then/else statements.
- nesting: Within an interpolated block, you can write XML in which you can use another interpolated block, and so on … With templates you can only do that one level, if you have a problem that requires you to have more, then you have to go back to string concatenation.
The XML notation and the extremely powerful interpolation mechanism have been re-used as is in JSX. Now let’s see the other parts of E4X that didn’t work so well and what JSX does to address them.
XML Objects
While the XML object looks and behaves in a similar way to a regular JavaScript object, the two are not the same thing. E4X introduces new syntax that only works with E4X XML objects. The syntax is designed to be familiar to JavaScript programmers, but E4X does not provide a direct mapping from XML to native JavaScript objects; just the illusion of one.
Downsides
The major use case of XML within Javascript is to write HTML tags. Unfortunately, what E4X generates is not a DOM node. In order to use it to generate DOM nodes, you’ve got to do a conversion phase not provided by default.
The second use case of XML is to represent data. In Javascript world, this use case is already being fulfilled by JSON. E4X only supports strings as a data type where Javascript objects can contain numbers, booleans, functions …
All the code is not going to be converted to E4X right away. There’s going to be a transition phase where E4X and non E4X code will have to co-exist. The fact that the objects E4X generates are not accessible from non E4X code means that none of the libraries ever written can work with E4X structures.
JSX
JSX, contrary to E4X, does not contain a runtime for XML, it is only a syntactic sugar. It translates XML syntax into function calls:
<Node attr1="first" attr2="second"> <Child /> </Node> |
is converted into the following standard Javascript:
Node({attr1: 'first', attr2: 'second'}, Child({}) ) |
The syntax is no longer tied to a specific implementation of the node representation. JSX is pure syntactic sugar. There are cases where you cannot use JSX, for example if you are writing your application in CoffeeScript, but it doesn’t prevent you from using the underlying implementation of the XML nodes.
Because it is only a syntactic sugar, there is no need to provide a way to express all the edge cases. Computed attributes, for example, are tricky because they introduce a lot of implementation specific questions when the same attribute is specified more than once. Instead of dealing with them, it has been decided not to support it in JSX and let the users do it in regular Javascript.
var attributes = {a: 1, b: 2, c: 3}; <Node *{attributes} /> // Not valid JSX Node(attributes) // Regular Javascript equivalent |
Namespaces
Each node is identified by a name. In order to prevent conflict in the meaning of the nodes, each node also contains a namespace, encoded as an URI.
default xml namespace = "http://www.w3.org/1999/xhtml"; <div />.name(); // { localName: 'div', uri: 'http://www.w3.org/1999/xhtml' } <svg xmlns="http://www.w3.org/2000/svg" />.name(); // { localName: 'svg', uri: 'http://www.w3.org/1999/svg' } <svg xmlns="http://www.w3.org/2000/svg"><circle /></svg>..circle.name(); // { localName: 'circle', uri: 'http://www.w3.org/1999/svg' } |
<svg xmlns="http://www.w3.org/2000/svg" />.name();
// { localName: ‘svg’, uri: ‘http://www.w3.org/1999/svg’ }
<svg xmlns="http://www.w3.org/2000/svg"><circle /></svg>..circle.name();
// { localName: ‘circle’, uri: ‘http://www.w3.org/1999/svg’ }
Every single element in E4X contains a namespace. Most of them use the default namespace that you can override using a special JS syntax default xml namespace =. You can also set a namespace on a node using the xmlns attribute and it’s going to be propagated to all the sub-tree.
The namespaces solve the problem of name conflict. E4X implements it making an identifier (URI namespace, String name) unique. This is indeed working but have downsides.
Downsides
This is very weird to have to specify a URL because this URL is just a unique identifier, it is not going to get fetched or influence the way the program run.
Maintaining a unique URL and making sure it is going to stay valid is not a trivial task. There are also many questions that are raised such as what happens if your project is private. How do you deal with versioning.
URLs are usually very long and they are a distraction when you look at the code. Everyone just copy and pasted the doctype value pre-HTML5.
In the end, the XML namespaces didn’t get really popular in the front-end community.
JSX
JSX uses Javascript to deal with the namespace problem. In E4X, each node type is not represented by a unique string across your program. In JSX a node type is represented by a Javascript variable. You can use all the Javascript features (eg variable hoisting, capturing via closure, function arguments …) in order to find the proper node type you want to use.
var div = ReactDOM.div; <div /> var div = JSXDOM.div; <div /> var div = SomeJSFunctionThatReturnsADiv(); <div /> |
var div = JSXDOM.div;
<div />
var div = SomeJSFunctionThatReturnsADiv();
<div />
JSX is also totally optional. The actual representation of a node type is behind the scenes just a Javascript function. If you are not using JSX, you can create the node by calling it the following way:
// Using JSX: <div attr="str"><br /></div> // Without JSX: ReactDOM.div({attr: 'str}, ReactDOM.br()); |
// Without JSX:
ReactDOM.div({attr: ‘str}, ReactDOM.br());
Because native DOM elements are used so often, JSX also have a way to declare a default namespace. You can add a special comment at the top of the file @jsx ReactDOM and JSX will assume that all the native elements are attributes of the object you mentioned. This is not the cleanest API but it works.
/** @jsx React.DOM */ <div /> // ReactDOM.div |
Query Language
E4X is not only about creating XML fragments, it also extends Javascript syntax in order to find elements in an XML document. The integration is well done and expressive, it is worth looking at it.
var people = ( <people> <person><name>Bob</name><age>32</age></person> <person><name>Joe</name><age>46</age></person> </people> ); people.person.(name == "Joe").age // 46 // Filter expressions can even use JavaScript functions: function over40(i) { return i > 40; } people.person.(over40(parseInt(age))).name // Joe elem.@attr // attribute |
people.person.(name == "Joe").age // 46
// Filter expressions can even use JavaScript functions:
function over40(i) {
return i > 40;
}
people.person.(over40(parseInt(age))).name // Joe
elem.@attr // attribute
Downsides
In my opinion, this is one of the main reason that prevented E4X from being more widely adopted.
In order to get a new language extension to be adopted by all the browsers, the bar is extremely high and this feature doesn’t seem to cut it.
- It isn’t really an issue in the community. jQuery became pretty successful thanks to its way to query the DOM. The overall feeling is that the current solution is satisfying and here hasn’t been a strong push for help at the syntax level.
- The query language extends the surface area. Creating XML and querying XML are two orthogonal concepts that do not need to be addressed together. Bundling them together highly reduces the chance of them being accepted.
- A query language is highly controversial. There isn’t a consensus on what’s the best way to query a XML document and will probably never be. It is even harder to sell as it isn’t even using an already existing standard such as XPath or CSS selectors but comes up with a completely new one.
JSX
It is not part of JSX.
Interpolation
Since E4X is not manipulating a plain string, it is able to differentiate between the parts that are nodes and the parts that are attributes and children. This has the extremely strong property from a security point of view that it can prevent code injections by automatically escaping attributes.
var userInput = '"<script>alert("Pwn3d!");</script>'; <div class={userInput} />.toXMLString() // <div class=""<script>alert("Pwn3d!")</script>"></div> |
Downsides
XML can only manipulate strings and nodes. This means that all the attributes are first converted to strings.
JSX
Since we are now living in a Javascript world, we don’t need to restrict ourself to strings. For example, it is possible to use a Javascript object to represent the style property:
<div style={{borderRadius: 10, borderColor: 'red'}} /> // <div style="-webkit-border-radius: 10px; border-color: red;" /> |
Callbacks don’t need to be passed as string that is going to be evaluated, it is possible to use normal Javascript functions.
<div onClick={function() { console.log('Clicked!'); }} /> |
More is Less
When studying E4X, I stumbled across many small things that I either found weird or not really needed. This section is a compilation of them.
Attributes values are not Strings
The attributes values are not Javascript strings, they are special objects with the toString method implemented.
<div class="something">.@class === 'something' // false <div class="something">.@class.toString() === 'something' // true |
Prototype syntax
They introduced a special syntax function:: to add new methods on XML objects:
XML.prototype.function::fooCount = function fooCount() { return this..foo.length(); }; <foobar><foo/><foo/><foo/></foobar>.fooCount() // returns 3 |
<foobar><foo/><foo/><foo/></foobar>.fooCount() // returns 3
Processing Instructions
E4X supports an obscure variant of XML tags: processing instructions of the form . There is a special flag to enable them in the output, but they are always properly parsed.
<foo><?process x="true"?></foo>.toXMLString() // <foo />; XML.ignoreProcessingInstructions = false; <foo><?process x="true"?></foo>.toXMLString() // <foo><?process x="true"?></foo>; |
XML.ignoreProcessingInstructions = false;
<foo><?process x="true"?></foo>.toXMLString()
// <foo><?process x="true"?></foo>;
Operator overload +=
The += operator can be used to append new elements to an XMLList.
var xmlList = <></>; xmlList += <node />; |
Operator overload for attributes
You can get and set attributes using @attr.
var element = <foo bar="1" />; console.log(element.@bar); // "1" element.@bar = 2; |
Conclusion
E4X had a lot of potential but unfortunately did not take off. JSX attempts to keep only the good parts of E4X. Since it is much smaller in features and only a Javascript transform, it is more likely to be adopted.
Nov
04
In this blog post, I explore another form of truthiness in Javascript. What happens if you use a bitwise operator on a value like 0|value or ~~value.
Context
We recently turned on the JSHint bitwise rule by default and the following code was caught.
var isValid = false; for (var i = 0; i < elements.length; ++i) { isValid |= elements.someProperty; } return isValid; |
The author didn’t mean to use a bitwise operator and wanted to write the following instead:
isValid = isValid || elements.someProperty; |
Unfortunately, while the two lines look similar, they do not behave the same for all Javascript values. Instead of using the truthiness rules, the value is first converted to a signed 32bit integer and compared against 0.
.bitwise-different { background-color: #ffffe0; }
Booleans and special values
In this system, booleans and special values are behaving as expected:
- 0 | undefined === 0
- 0 | null === 0
- 0 | false === 0
- 0 | true === 1
Numbers
It becomes a bit more tricky with numbers. The double is first converted to signed 32 bits integer and then compared to 0.
For usual integers, it is working as expected, only 0 is falsy.
- 0 | 0 === 0
- 0 | 1 === 1
- 0 | 42 === 42
- 0 | -1 === -1
NaN (not a number) is considered as falsy, still going as expected.
- 0 | NaN === 0
For non integers, it is more tricky. Any number in the range ]-1, 1[ is going to be falsy. Lines highlighted in yellow do not behave the same as normal truthy values.
- 0 | 0.99 === 0
- 0 | -0.99 === 0
- 0 | 1.01 === 1
For big integers, the situation is even more confusing. They are all truthy except multiples of 232. This is true even after 253.
- 0 | Math.pow(2, 32) === 0
- 0 | 3 * Math.pow(2, 32) === 0
- 0 | Math.pow(2, 53) === 0
- 0 | Math.pow(2, 60) === 0
- 0 | Math.pow(2, 32) + 1 === 1
Strings
Contrary to normal truthiness, strings in general are falsy.
- 0 | “” === 0
- 0 | ” ” === 0
- 0 | “a” === 0
But, strings that represent numbers now follow number rules.
- 0 | “0” === 0
- 0 | “1” === 1
- 0 | “0.5” === 0
The number parser is not rigid and accept inputs that have whitespace around for example.
- 0 | ” 1 ” === 1
Objects
Objects are first converted to string before being converted to int32. So nearly all objects are falsy because their string representation is "[object Object]".
- 0 | {} === 0
- 0 | {key: 1} === 0
You can still craft objects that passes that check by overriding toString.
- 0 | {toString: function() { return “1”; }} === 1
Conclusion
The normal truthiness rules can be quite misleading, but if you want to shoot yourself in the foot, I highly encourage you to replace all your !!expression into 0|expression. This will give you endless hours of debugging fun.
Nov
04
Dealing with scroll position when you insert content is usually a difficult problem to solve. We’ll see how to use React life cycle methods to solve it elegantly.
Insertion at the bottom
The first example is to maintain the scroll position at the bottom when an element is inserted at the bottom. A common use case is a chat application.
In order to scroll at the bottom, we can do that on componentDidUpdate. It happens every time the element is re-rendered.
componentDidUpdate: function() { var node = this.getDOMNode(); node.scrollTop = node.scrollHeight; }, |
But this is going to always scroll to the bottom, which can be very annoying if you want to read what was above. Instead you want to scroll only if the user was already at the bottom. To do that, we can check the scroll position before the component has updated with componentWillUpdate and scroll if necessary at componentDidUpdate
componentWillUpdate: function() { var node = this.getDOMNode(); this.shouldScrollBottom = node.scrollTop + node.offsetHeight === node.scrollHeight; }, componentDidUpdate: function() { if (this.shouldScrollBottom) { var node = this.getDOMNode(); node.scrollTop = node.scrollHeight } }, |
componentDidUpdate: function() {
if (this.shouldScrollBottom) {
var node = this.getDOMNode();
node.scrollTop = node.scrollHeight
}
},
Note: we use this.shouldScrollBottom = ...; and not this.setState({shouldScrollBottom: ...}); because we don’t want to trigger another render. We just need to manage that value between the two events.
Insertion at the top
The other use case is adding elements at the top of the page but doing so without screwing up the current scroll position of the user. An example is a log view where you can scroll to the top to read historical context.
This is using a similar technique. On componentWillUpdate we store the scroll position and on componentDidUpdate we scroll to the added delta.
componentWillUpdate: function() { var node = this.getDOMNode(); this.scrollHeight = node.scrollHeight; this.scrollTop = node.scrollTop; }, componentDidUpdate: function() { var node = this.getDOMNode(); node.scrollTop = this.scrollTop + (node.scrollHeight - this.scrollHeight); }, |
componentDidUpdate: function() {
var node = this.getDOMNode();
node.scrollTop = this.scrollTop + (node.scrollHeight – this.scrollHeight);
},
Conclusion
React has not been designed to handle scroll position natively. However, it provides escape hatches from the declarative paradigm in order to be able to implement them.